About

Pages - Menu

28.12.09

Beef Lasagna

This was my first time making an easy beef lasagna and it turned out really good! It wasn't mushy and gluggy like the ones I watched on Youtube! It turned out crispy and not dry and that's what I wanted. I was afraid that I didn't put enough meat sauce between the layers of the sheets but it turned out just right. Maybe when I bake it the second time I will put more meat sauce just to make the lasagna look a bit fatter :P.


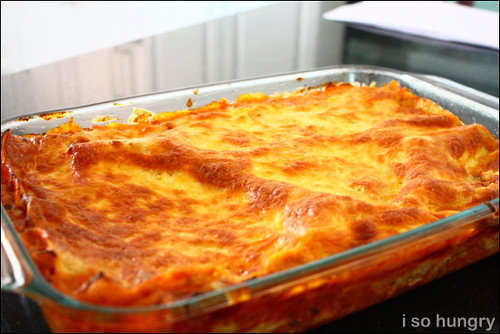
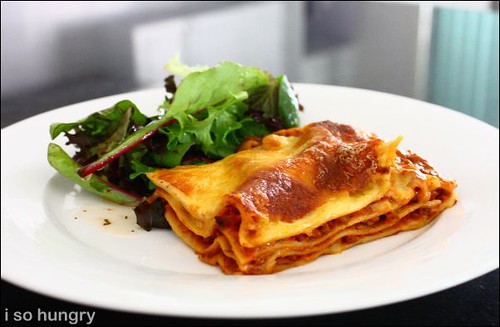
Beef Lasagna (by San Remo)

  • 250g San Remo Large Instant Lasagna
  • 2 tbsp of olive oil
  • 1 onion finely chopped
  • 1 carrot finely chopped (I omitted it, added mushrooms instead)
  • 1 clove of garlic crushed
  • 500g of minced beef
  • 5 tbsp of tomato paste
  • 2 x 400g canned tomatoes
  • 2 cups chicken stock (I just used water)
  • salt and pepper to taste
  • pinch of nutmeg (I omitted it, added oregano or Italian herbs)
  • 2 tbsp of butter
  • 2 tbsp of flour
  • 2 cups of milk
  • 125g of mozzerella cheese (I put more cheese in it :P....)

Meat Sauce:
Heat oil in sauce pan. Add onion, carrot and garlic and cook until soft. Then add the beef mince and cook til browned. Stir in tomato paste, canned tomatoes and chicken stock. Season with salt and pepper and nutmeg. Cover and cook gently for 20 minutes.

Cheese Sauce:
Melt butter in separate saucepan, stir in flour and cook for 2 minutes over gentle heat. Remove from heat and stir in the milk. Return to heat, stir til thick and smooth. Season with salt and pepper and add the cheese stirring over low heat til cheese melts.

Assembly:
Preheat oven to 180 degrees. Pour half cup of meat sauce into lightly greased baking dish. Alternate layers of lasagna, meat and cheese sauces ending with cheese sauce layer (allow four layers).

So - meat sauce first, sheets, meat sauce, cheese, sheets, meat sauce, cheese, sheets.....and repeat ending with cheese sauce layer.

Sprinkle with grated Parmesan cheese, bake in oven for 35 minutes to 40 minutes or until cooked through. Let stand for 5 minutes before serving. Can serve with hot chips or salad on the side.

Hint: Make sure the lasagna sheets are completely covered with the meat sauce to retain high level of moisture.


24.12.09

Thin and Crispy Oatmeal Cookies


Wow it has been a long time since last time I've updated! I have been terribly busy with Christmas and just spending time with my love fixing the backyard. I have a bit of time out and I like to share you this wonderful crispy and thin oatmeal cookie which I have found on the Monthly Challenge site (which they sourced from the Cooks Illustrated magazine).

Okay mine didn't turn out as thin as the the photo did on Cooks Illustrated but it was pretty crunchy, crispy and chewy when bitten into the inside. I had a bit of trouble converting 14T unsalted butter cause I can't really read it. When I looked it up on the internet to convert it into grams .....it was a bit too much butter! But...I used what the recipe said anyway lol.

Thin and Crispy Oatmeal Cookies
by Cooks Illustrated

  • 1 cup flour
  • 3/4 tsp baking powder
  • 1/2 tsp baking soda
  • 1/2 tsp salt
  • 14 T unsalted butter, softened, but still cool (65 degrees)
  • 1 cup sugar
  • 1/4 cup light brown sugar
  • 1 large egg
  • 1 tsp vanilla extract
  • 2 1/2 cups old fashioned rolled oats

1. Adjust oven rack to middle position and heat oven to 350. Line 3 large baking sheets with parchment paper. Whisk flour, baking powder, baking soda, salt in medium bowl.

2. In standing mixer fitted with paddle, beat butter and sugars at medium-low speed, about 20 seconds. Increase speed to medium and continue to beat until light and fluffy, about 1 minute longer. Scrape down bowl with rubber spatula. Add egg and vanilla and beat on medium low until fully incorporated, about 30 seconds. Scrape down bowl again. With mixer running at low speed, add flour mixture and mix until just incorporated and smooth, 10 seconds. With mixer still running on low, gradually add oats and mix until well incorporated, 20 seconds. Give dough final stir with spatula to ensure no flour pockets remain.

3. Divide dough into 24 portions, each about 2 T, then roll between palms into balls. Place cookies on prepared baking sheets, spacing them 2 1/2 inches apart, 8 dough balls per sheet. Using fingertips, gently press ball to 3/4 inch thickness.

4. Bake 1 sheet at a time until cookies are deep golden brown, edges are crisp, and centers yield to slight pressure when touched, 13 to 16 minutes, rotating sheet halfway through. Transfer baking sheet to wire rack;cool cookies completely on sheet.


Happy Christmas Everyone! Enjoy and have a safe and happy new year :)

16.12.09

Custard & Raisin Snails


I was trying to mimic my former boss's (baker) "custard snails" that were the best snails I have ever tried around here. It's not overly too sweet and the consistency of the custard and the sweet bread were perfect. These snails always sold out during the day and the bakeries around the area started to copy lol.

Anyways, I had a lot of trouble finding a recipe that was easy and quick and to make. I didn't want to hang around too long for the yeast to prove for example over night.

I found this recipe from http://jodelibakery.netfirms.com but kind of alternated some of the ingredients according to what I had in the pantry. My custard filling wasn't pudding like consistency enough and it exploded while rolling it up. It went all gluggy and messed up my bench lol. Other than that the buns turned out very nicely.


CUSTARD RAISIN SNAILS by Jodelibakery


Makes 12

Dough:

* 3 cups of plain flour
* 50g castor sugar
* 2 tsp instant yeast
* 1 egg
* 180ml water
* 50g butter

Filling:

* 60g instant custard powder
* 120g milk
* 1/2 cup raisins

Sugar Glaze:

* 1 Part water and 2 part of sugar


Instructions:

1. Combine and blend flours, castor sugar, instant yeast, water and egg in a mixing bowl and knead for about 10 minutes

2. Add butter. Continue to knead for 15 minutes until the dough is elastic, smooth, non-sticky and pull away from the sides of the bowl. To test, stretch a pinch of dough. This dough should form a thin membrane before it breaks

3. Form the dough into a ball. Place dough in a greased stainless steel bowl and cover with a damp tea towel. Leave in warm place for about 50-60 minutes until doubled in size.

4. At the meantime, prepare custard filling. Combine instant custard powder and milk in a mixing bowl. Use a hand whisk to stir till smooth and pudding-like custard is formed. Set aside. Put raisins in another mixing bowl. Add enough water to cover all raisins. Soak till raisins are soft. Drain well and set aside.

5. Use the “finger-tip” test to check if the dough has fully risen

6. Punch the dough down to release gases produced in the proving process. Rest for 5 minutes before going on to shaping.

7. Slightly grease working surface. Roll bread dough out to a 15 x 11″ rectangle. Spread custard on to dough and sprinkle raisins on custard. Roll dough up tightly to contain filling.

8. Using a sharp knife, divide roll into approx. 12 portions. Arrange on baking tray. Proof bread for 30-45 minutes or until double in size (it may take longer depends on weather).

9. Bake in preheated oven at 180 degC for 20-25 minutes.

10. While buns are baking, make the sugar syrup. Boil water and add sugar and mix. The mix should be a syrupy consistency. Cool and set aside.

11. Cool buns completely on wire rack and brush with glaze.

12. Store in container. Best served within 2-3 days.

11.12.09

Ann's Bacon & Cheese Slices/Rolls


I made these bacon and cheese rolls the other day and oh my goodness it was so so so yummy!

These bacon and cheese slices were meant to be a pull apart bread but I thought 'hmm I wanted to make something crispy not really soft' so I changed my mind and opted for this while rolling the dough. Instead of using just cheese and bacon I made garlic butter and added rosemary and thyme. My goodness it worked out very well at the end. It came out hot and crispy and so so so delicious. Fattening but who cares!


I recommend you to eat this straight away because I find it when you want to keep it for the next day it gets a bit hard. I usually pop some slices in the microwave on high for 10 secs. It goes soft again and it smells great.


Main ingredients.


Ann's Bacon and Cheese Slices/Rolls

Preparation: 1/2 hour plus 1 1/2 hours for proving
Makes: 20 slices (10 per tray)

Ingredients:
  • 1 sachet dried yeast
  • 1/2 cup warm water
  • extra water
  • 4 cups plain flour
  • 1 tsp salt
  • 50 grams of butter
  • 3 cloves of garlic, minced
  • 250 grams bacon rashers chopped into small pieces
  • 1 cup of tasty cheese grated
  • 1 tsp of rosemary
  • 1 tsp of thyme

Instructions

1. Combine yeast and water into a small bowl. Set aside in a warm place for about 15 minutes. The mixture should go frothy. If it does not froth do it again because the frothy mixture tells us that the yeast is active. This makes sure the bread will rise.

2. Sift the flour and salt into a big bowl. Make a well in the centre and add 1 to 2 cups of warm water plus the yeast mixture. Incorporate ingredients to make a soft dough. If you find the dough is still crumbly add more water and if you find the dough too sticky add a bit more flour until you get a soft dough. Then knead on a lightly floured surface for 10 minutes until the dough is smooth.

3. Place the dough in a lightly oiled bowl and cover with a damp towel. Set aside for 1 hour or until the dough has doubled in size.

4. Meanwhile while the dough is proving, grease 2 trays (9 x 12 inches) and lay with greaseproof paper.

5. In a microwave proof bowl, place 50grams of butter and minced garlic and microwave on high for about 30 secs or until butter is soft and nearly melted. The garlic butter mixture shouldn't melt but a pasty kind of consistency.

6. Punch dough with fist to release the air. Knead for about 1 minute until smooth. Divide the dough into 2 and roll both of them in a rectangle shape to fit the trays. Then spread the dough with the garlic butter mixture and making sure that you leave the edges for a crust.

7. Then sprinkle bacon pieces over the rolled out dough. Make sure its even and consistent. You don't want clusters! And then do the same for the grated cheese. Finally sprinkle rosemary and thyme over bacon and cheese.

8. Preheat oven to 200oC and let bread rise for a further half hour.

9. Bake 2 trays for about 20 - 25 minutes or until cheese has melted and bread is golden brown.

10. Cut into equal slices for each tray (10 slices per tray).

2.12.09

How to Make Soft Rice Paper Roll (with Prawn and Pork) & Dipping Sauce

soft rice paper rolls
Soft Rice Paper Rolls (with Prawn and Pork)

My all time favourite Vietnamese dish would have to be Soft Rice Paper Rolls!! Why? This is because it can be used to wrap up a wide range of fillings of your choice from meat, fish, chicken, noodles or veges. It's a fun way to entertain and get family and friends together. Each person can assemble their own unique spring roll according to their taste and preferences.

The main essential fillings for the rice paper rolls are vermicelli noodles and herbs and you can add whatever meat you desire. I like either beef or pork or even those crunchy deep fried spring rolls.

Today I am going to show you have to make Prawn and Pork Rice Paper Rolls and Dipping Sauce to go with it. You can also find these at Asian Grocers already made for you for about $4 a container with their special dipping sauce! YUmmmm...


Soft Rice Paper Roll (with Prawn and Pork)

To make about 20 rolls you will need:
  • 1/2 kg of pork rashers or you can use pork neck. (i used half of the pack in the photo below)
  • approx 20 prawns cooked and peeled and cut half side ways
  • fresh herbs / lettuce
  • vermicelli noodles
  • 20 rice paper sheets
  • warm water for dipping the sheets
  • dipping sauce!

Some of the ingredients!

Instructions:

- Place rashes in a pot of boiling water on medium heat. Cook through well. Then take out of the water and set it aside to cool. Cut up in 1 cm pieces.

- I bought my prawns already cooked. If you bought it fresh then boil it until it changes colour and let it cool. Then peel prawns. And then slice it half side ways (like the pic below).

- In another pot, cook the noodles according to instructions. Drain well and set aside.

- Lay all the ingredients out as shown below. You can have it in any order you like but the prawns must come first just for presentation wise!


In order....doesn't have to be but the rice paper and then the prawn must be first

- Fill a large bowl with warm water. Now place a sheet of rice paper and dip it into the water and take it out. Immediately lay this on a big plate. (Don't go soaking your sheet......yuckkk it will go all soggy gross! lol and then you can't even roll it properly!)

- Then place the prawns (cut side up), then noodles, herbs and pork on the botton edge of the rice paper roll near towards your body. Leave enough paper to roll the sheet over to cover the ingredients.

- Fold over the rice sheet paper until all the ingredients are covered.

- Roll until the prawn side is facing downwards onto the plate. Then fold each side to seal the two ends of the paper.

- Repeat the process until all ingredients are used up

- Place on a nice serving dish and serve with dipping sauce.


This is a slide show on How to make rice paper roll. I thought it would be easier than explaining it :)


Now make the sauce!

Vietnamese Dipping Sauce
Please adjust the ingredients to your taste

1/2 cup fish sauce
1/2 cup sugar
1/4 squeezed lime or lemon
2 garlic cloves minced
2 chilli's minced
some water


Vietnamese dipping sauce


Directions:
- Get a jar that is sealable (empty jam jar) and add water and sugar. Mix to dissolve the sugar. Then add the fish sauce and lime or lemon juice.

- Then add in the garlic and chillis. Taste. Add more fish sauce or water according to your preference.
- Serve immediately. It is recommended that you store in the fridge. Lasts for a couple of months.

1.12.09

Iced Hermits


Iced Hermits

I was surfing foodie blogs today and came across this awesome cookie site "Every Last Cookie" and stumbled upon this yummy recipe by Martha Stewart. I was looking for something to bake that wasn't sweet. So I thought this must taste good cause it looked bloody nice! When I finished baking them and left them to cool and topped them with icing sugar mix..............I had a bite of it............it was chewy and gingery. Martha suggests the they are "best a day or two after they are baked so the flavours have a chance to deepen". It also lasts up to 5 days! So you can make batches of them without having to worry to eat them quickly before it goes off!


Iced Hermits ready to be scoffed down lol

Don't try to make if you hate ginger!! My boyfriend doesn't like it and I quite ...........like it lol (Am I in denial here? lol).


ICED HERMITS

Ingredients

Makes about 3 dozen

  • 1/2 cup (1 stick) unsalted butter, softened, plus more for baking sheet
  • 1 3/4 cups all-purpose flour
  • 3/4 teaspoon baking powder
  • 3/4 teaspoon baking soda
  • 1 tablespoon ground ginger
  • 1 teaspoon ground cinnamon
  • 1/2 teaspoon ground nutmeg
  • 3/4 cup raisins
  • 1 cup chopped candied ginger, cut into 1/4-inch pieces
  • 1/4 cup unsulfured molasses
  • 1 large egg plus 1 large egg yolk
  • 1 1/4 cups packed dark-brown sugar
  • Pinch of ground cloves
  • 1/4 teaspoon coarse salt
  • 1/4 teaspoon freshly ground pepper
  • 1/4 cup packed light-brown sugar
  • 2 tablespoons whole milk, plus more if needed
  • 2 tablespoons unsalted butter
  • 1 teaspoon pure vanilla extract
  • 1 cup sifted confectioners' sugar, plus more if needed

Directions

  1. Make bars: Preheat oven to 350 degrees. Butter a 10-by-15-inch rimmed baking sheet. Line bottom with parchment paper, and butter parchment; set aside. Whisk together flour, baking powder, baking soda, ground ginger, cinnamon, nutmeg, salt, pepper, and cloves in a medium bowl; set aside.
  2. Put butter in the bowl of an electric mixer fitted with the paddle attachment. Beat on medium speed until smooth. Add sugar; mix until pale and fluffy, about 2 minutes. Mix in egg and yolk, and molasses. Reduce speed to low; gradually mix in flour mixture. Mix in 1/2 cup candied ginger and the raisins.
  3. Spread dough evenly onto prepared baking sheet. Bake, rotating sheet halfway through, until firm, 18 to 22 minutes. Let cool completely in baking sheet on a wire rack.
  4. Make icing: Put brown sugar, milk, and butter in a medium saucepan over medium heat. Cook, stirring constantly, until butter has melted and sugar has dissolved. Remove from heat; whisk in vanilla and confectioners sugar. If icing is too thick to drizzle, stir in more milk, a teaspoon at a time. If icing is too thin, stir in more confectioners sugar, a teaspoon at a time. Let cool slightly.
  5. Drizzle bars with icing; sprinkle with remaining 1/2 cup candied ginger. Let stand until icing has set, about 15 minutes. Cut into 2-inch squares. Bars can be stored in single layers in airtight containers at room temperature up to 5 days.