About

Pages - Menu

28.12.09

Beef Lasagna

This was my first time making an easy beef lasagna and it turned out really good! It wasn't mushy and gluggy like the ones I watched on Youtube! It turned out crispy and not dry and that's what I wanted. I was afraid that I didn't put enough meat sauce between the layers of the sheets but it turned out just right. Maybe when I bake it the second time I will put more meat sauce just to make the lasagna look a bit fatter :P.


Beef Lasagna (by San Remo)

  • 250g San Remo Large Instant Lasagna
  • 2 tbsp of olive oil
  • 1 onion finely chopped
  • 1 carrot finely chopped (I omitted it, added mushrooms instead)
  • 1 clove of garlic crushed
  • 500g of minced beef
  • 5 tbsp of tomato paste
  • 2 x 400g canned tomatoes
  • 2 cups chicken stock (I just used water)
  • salt and pepper to taste
  • pinch of nutmeg (I omitted it, added oregano or Italian herbs)
  • 2 tbsp of butter
  • 2 tbsp of flour
  • 2 cups of milk
  • 125g of mozzerella cheese (I put more cheese in it :P....)

Meat Sauce:
Heat oil in sauce pan. Add onion, carrot and garlic and cook until soft. Then add the beef mince and cook til browned. Stir in tomato paste, canned tomatoes and chicken stock. Season with salt and pepper and nutmeg. Cover and cook gently for 20 minutes.

Cheese Sauce:
Melt butter in separate saucepan, stir in flour and cook for 2 minutes over gentle heat. Remove from heat and stir in the milk. Return to heat, stir til thick and smooth. Season with salt and pepper and add the cheese stirring over low heat til cheese melts.

Assembly:
Preheat oven to 180 degrees. Pour half cup of meat sauce into lightly greased baking dish. Alternate layers of lasagna, meat and cheese sauces ending with cheese sauce layer (allow four layers).

So - meat sauce first, sheets, meat sauce, cheese, sheets, meat sauce, cheese, sheets.....and repeat ending with cheese sauce layer.

Sprinkle with grated Parmesan cheese, bake in oven for 35 minutes to 40 minutes or until cooked through. Let stand for 5 minutes before serving. Can serve with hot chips or salad on the side.

Hint: Make sure the lasagna sheets are completely covered with the meat sauce to retain high level of moisture.


24.12.09

Thin and Crispy Oatmeal Cookies


Wow it has been a long time since last time I've updated! I have been terribly busy with Christmas and just spending time with my love fixing the backyard. I have a bit of time out and I like to share you this wonderful crispy and thin oatmeal cookie which I have found on the Monthly Challenge site (which they sourced from the Cooks Illustrated magazine).

Okay mine didn't turn out as thin as the the photo did on Cooks Illustrated but it was pretty crunchy, crispy and chewy when bitten into the inside. I had a bit of trouble converting 14T unsalted butter cause I can't really read it. When I looked it up on the internet to convert it into grams .....it was a bit too much butter! But...I used what the recipe said anyway lol.

Thin and Crispy Oatmeal Cookies
by Cooks Illustrated

  • 1 cup flour
  • 3/4 tsp baking powder
  • 1/2 tsp baking soda
  • 1/2 tsp salt
  • 14 T unsalted butter, softened, but still cool (65 degrees)
  • 1 cup sugar
  • 1/4 cup light brown sugar
  • 1 large egg
  • 1 tsp vanilla extract
  • 2 1/2 cups old fashioned rolled oats

1. Adjust oven rack to middle position and heat oven to 350. Line 3 large baking sheets with parchment paper. Whisk flour, baking powder, baking soda, salt in medium bowl.

2. In standing mixer fitted with paddle, beat butter and sugars at medium-low speed, about 20 seconds. Increase speed to medium and continue to beat until light and fluffy, about 1 minute longer. Scrape down bowl with rubber spatula. Add egg and vanilla and beat on medium low until fully incorporated, about 30 seconds. Scrape down bowl again. With mixer running at low speed, add flour mixture and mix until just incorporated and smooth, 10 seconds. With mixer still running on low, gradually add oats and mix until well incorporated, 20 seconds. Give dough final stir with spatula to ensure no flour pockets remain.

3. Divide dough into 24 portions, each about 2 T, then roll between palms into balls. Place cookies on prepared baking sheets, spacing them 2 1/2 inches apart, 8 dough balls per sheet. Using fingertips, gently press ball to 3/4 inch thickness.

4. Bake 1 sheet at a time until cookies are deep golden brown, edges are crisp, and centers yield to slight pressure when touched, 13 to 16 minutes, rotating sheet halfway through. Transfer baking sheet to wire rack;cool cookies completely on sheet.


Happy Christmas Everyone! Enjoy and have a safe and happy new year :)

16.12.09

Custard & Raisin Snails


I was trying to mimic my former boss's (baker) "custard snails" that were the best snails I have ever tried around here. It's not overly too sweet and the consistency of the custard and the sweet bread were perfect. These snails always sold out during the day and the bakeries around the area started to copy lol.

Anyways, I had a lot of trouble finding a recipe that was easy and quick and to make. I didn't want to hang around too long for the yeast to prove for example over night.

I found this recipe from http://jodelibakery.netfirms.com but kind of alternated some of the ingredients according to what I had in the pantry. My custard filling wasn't pudding like consistency enough and it exploded while rolling it up. It went all gluggy and messed up my bench lol. Other than that the buns turned out very nicely.


CUSTARD RAISIN SNAILS by Jodelibakery


Makes 12

Dough:

* 3 cups of plain flour
* 50g castor sugar
* 2 tsp instant yeast
* 1 egg
* 180ml water
* 50g butter

Filling:

* 60g instant custard powder
* 120g milk
* 1/2 cup raisins

Sugar Glaze:

* 1 Part water and 2 part of sugar


Instructions:

1. Combine and blend flours, castor sugar, instant yeast, water and egg in a mixing bowl and knead for about 10 minutes

2. Add butter. Continue to knead for 15 minutes until the dough is elastic, smooth, non-sticky and pull away from the sides of the bowl. To test, stretch a pinch of dough. This dough should form a thin membrane before it breaks

3. Form the dough into a ball. Place dough in a greased stainless steel bowl and cover with a damp tea towel. Leave in warm place for about 50-60 minutes until doubled in size.

4. At the meantime, prepare custard filling. Combine instant custard powder and milk in a mixing bowl. Use a hand whisk to stir till smooth and pudding-like custard is formed. Set aside. Put raisins in another mixing bowl. Add enough water to cover all raisins. Soak till raisins are soft. Drain well and set aside.

5. Use the “finger-tip” test to check if the dough has fully risen

6. Punch the dough down to release gases produced in the proving process. Rest for 5 minutes before going on to shaping.

7. Slightly grease working surface. Roll bread dough out to a 15 x 11″ rectangle. Spread custard on to dough and sprinkle raisins on custard. Roll dough up tightly to contain filling.

8. Using a sharp knife, divide roll into approx. 12 portions. Arrange on baking tray. Proof bread for 30-45 minutes or until double in size (it may take longer depends on weather).

9. Bake in preheated oven at 180 degC for 20-25 minutes.

10. While buns are baking, make the sugar syrup. Boil water and add sugar and mix. The mix should be a syrupy consistency. Cool and set aside.

11. Cool buns completely on wire rack and brush with glaze.

12. Store in container. Best served within 2-3 days.

11.12.09

Ann's Bacon & Cheese Slices/Rolls


I made these bacon and cheese rolls the other day and oh my goodness it was so so so yummy!

These bacon and cheese slices were meant to be a pull apart bread but I thought 'hmm I wanted to make something crispy not really soft' so I changed my mind and opted for this while rolling the dough. Instead of using just cheese and bacon I made garlic butter and added rosemary and thyme. My goodness it worked out very well at the end. It came out hot and crispy and so so so delicious. Fattening but who cares!


I recommend you to eat this straight away because I find it when you want to keep it for the next day it gets a bit hard. I usually pop some slices in the microwave on high for 10 secs. It goes soft again and it smells great.


Main ingredients.


Ann's Bacon and Cheese Slices/Rolls

Preparation: 1/2 hour plus 1 1/2 hours for proving
Makes: 20 slices (10 per tray)

Ingredients:
  • 1 sachet dried yeast
  • 1/2 cup warm water
  • extra water
  • 4 cups plain flour
  • 1 tsp salt
  • 50 grams of butter
  • 3 cloves of garlic, minced
  • 250 grams bacon rashers chopped into small pieces
  • 1 cup of tasty cheese grated
  • 1 tsp of rosemary
  • 1 tsp of thyme

Instructions

1. Combine yeast and water into a small bowl. Set aside in a warm place for about 15 minutes. The mixture should go frothy. If it does not froth do it again because the frothy mixture tells us that the yeast is active. This makes sure the bread will rise.

2. Sift the flour and salt into a big bowl. Make a well in the centre and add 1 to 2 cups of warm water plus the yeast mixture. Incorporate ingredients to make a soft dough. If you find the dough is still crumbly add more water and if you find the dough too sticky add a bit more flour until you get a soft dough. Then knead on a lightly floured surface for 10 minutes until the dough is smooth.

3. Place the dough in a lightly oiled bowl and cover with a damp towel. Set aside for 1 hour or until the dough has doubled in size.

4. Meanwhile while the dough is proving, grease 2 trays (9 x 12 inches) and lay with greaseproof paper.

5. In a microwave proof bowl, place 50grams of butter and minced garlic and microwave on high for about 30 secs or until butter is soft and nearly melted. The garlic butter mixture shouldn't melt but a pasty kind of consistency.

6. Punch dough with fist to release the air. Knead for about 1 minute until smooth. Divide the dough into 2 and roll both of them in a rectangle shape to fit the trays. Then spread the dough with the garlic butter mixture and making sure that you leave the edges for a crust.

7. Then sprinkle bacon pieces over the rolled out dough. Make sure its even and consistent. You don't want clusters! And then do the same for the grated cheese. Finally sprinkle rosemary and thyme over bacon and cheese.

8. Preheat oven to 200oC and let bread rise for a further half hour.

9. Bake 2 trays for about 20 - 25 minutes or until cheese has melted and bread is golden brown.

10. Cut into equal slices for each tray (10 slices per tray).

2.12.09

How to Make Soft Rice Paper Roll (with Prawn and Pork) & Dipping Sauce

soft rice paper rolls
Soft Rice Paper Rolls (with Prawn and Pork)

My all time favourite Vietnamese dish would have to be Soft Rice Paper Rolls!! Why? This is because it can be used to wrap up a wide range of fillings of your choice from meat, fish, chicken, noodles or veges. It's a fun way to entertain and get family and friends together. Each person can assemble their own unique spring roll according to their taste and preferences.

The main essential fillings for the rice paper rolls are vermicelli noodles and herbs and you can add whatever meat you desire. I like either beef or pork or even those crunchy deep fried spring rolls.

Today I am going to show you have to make Prawn and Pork Rice Paper Rolls and Dipping Sauce to go with it. You can also find these at Asian Grocers already made for you for about $4 a container with their special dipping sauce! YUmmmm...


Soft Rice Paper Roll (with Prawn and Pork)

To make about 20 rolls you will need:
  • 1/2 kg of pork rashers or you can use pork neck. (i used half of the pack in the photo below)
  • approx 20 prawns cooked and peeled and cut half side ways
  • fresh herbs / lettuce
  • vermicelli noodles
  • 20 rice paper sheets
  • warm water for dipping the sheets
  • dipping sauce!

Some of the ingredients!

Instructions:

- Place rashes in a pot of boiling water on medium heat. Cook through well. Then take out of the water and set it aside to cool. Cut up in 1 cm pieces.

- I bought my prawns already cooked. If you bought it fresh then boil it until it changes colour and let it cool. Then peel prawns. And then slice it half side ways (like the pic below).

- In another pot, cook the noodles according to instructions. Drain well and set aside.

- Lay all the ingredients out as shown below. You can have it in any order you like but the prawns must come first just for presentation wise!


In order....doesn't have to be but the rice paper and then the prawn must be first

- Fill a large bowl with warm water. Now place a sheet of rice paper and dip it into the water and take it out. Immediately lay this on a big plate. (Don't go soaking your sheet......yuckkk it will go all soggy gross! lol and then you can't even roll it properly!)

- Then place the prawns (cut side up), then noodles, herbs and pork on the botton edge of the rice paper roll near towards your body. Leave enough paper to roll the sheet over to cover the ingredients.

- Fold over the rice sheet paper until all the ingredients are covered.

- Roll until the prawn side is facing downwards onto the plate. Then fold each side to seal the two ends of the paper.

- Repeat the process until all ingredients are used up

- Place on a nice serving dish and serve with dipping sauce.


This is a slide show on How to make rice paper roll. I thought it would be easier than explaining it :)


Now make the sauce!

Vietnamese Dipping Sauce
Please adjust the ingredients to your taste

1/2 cup fish sauce
1/2 cup sugar
1/4 squeezed lime or lemon
2 garlic cloves minced
2 chilli's minced
some water


Vietnamese dipping sauce


Directions:
- Get a jar that is sealable (empty jam jar) and add water and sugar. Mix to dissolve the sugar. Then add the fish sauce and lime or lemon juice.

- Then add in the garlic and chillis. Taste. Add more fish sauce or water according to your preference.
- Serve immediately. It is recommended that you store in the fridge. Lasts for a couple of months.

1.12.09

Iced Hermits


Iced Hermits

I was surfing foodie blogs today and came across this awesome cookie site "Every Last Cookie" and stumbled upon this yummy recipe by Martha Stewart. I was looking for something to bake that wasn't sweet. So I thought this must taste good cause it looked bloody nice! When I finished baking them and left them to cool and topped them with icing sugar mix..............I had a bite of it............it was chewy and gingery. Martha suggests the they are "best a day or two after they are baked so the flavours have a chance to deepen". It also lasts up to 5 days! So you can make batches of them without having to worry to eat them quickly before it goes off!


Iced Hermits ready to be scoffed down lol

Don't try to make if you hate ginger!! My boyfriend doesn't like it and I quite ...........like it lol (Am I in denial here? lol).


ICED HERMITS

Ingredients

Makes about 3 dozen

  • 1/2 cup (1 stick) unsalted butter, softened, plus more for baking sheet
  • 1 3/4 cups all-purpose flour
  • 3/4 teaspoon baking powder
  • 3/4 teaspoon baking soda
  • 1 tablespoon ground ginger
  • 1 teaspoon ground cinnamon
  • 1/2 teaspoon ground nutmeg
  • 3/4 cup raisins
  • 1 cup chopped candied ginger, cut into 1/4-inch pieces
  • 1/4 cup unsulfured molasses
  • 1 large egg plus 1 large egg yolk
  • 1 1/4 cups packed dark-brown sugar
  • Pinch of ground cloves
  • 1/4 teaspoon coarse salt
  • 1/4 teaspoon freshly ground pepper
  • 1/4 cup packed light-brown sugar
  • 2 tablespoons whole milk, plus more if needed
  • 2 tablespoons unsalted butter
  • 1 teaspoon pure vanilla extract
  • 1 cup sifted confectioners' sugar, plus more if needed

Directions

  1. Make bars: Preheat oven to 350 degrees. Butter a 10-by-15-inch rimmed baking sheet. Line bottom with parchment paper, and butter parchment; set aside. Whisk together flour, baking powder, baking soda, ground ginger, cinnamon, nutmeg, salt, pepper, and cloves in a medium bowl; set aside.
  2. Put butter in the bowl of an electric mixer fitted with the paddle attachment. Beat on medium speed until smooth. Add sugar; mix until pale and fluffy, about 2 minutes. Mix in egg and yolk, and molasses. Reduce speed to low; gradually mix in flour mixture. Mix in 1/2 cup candied ginger and the raisins.
  3. Spread dough evenly onto prepared baking sheet. Bake, rotating sheet halfway through, until firm, 18 to 22 minutes. Let cool completely in baking sheet on a wire rack.
  4. Make icing: Put brown sugar, milk, and butter in a medium saucepan over medium heat. Cook, stirring constantly, until butter has melted and sugar has dissolved. Remove from heat; whisk in vanilla and confectioners sugar. If icing is too thick to drizzle, stir in more milk, a teaspoon at a time. If icing is too thin, stir in more confectioners sugar, a teaspoon at a time. Let cool slightly.
  5. Drizzle bars with icing; sprinkle with remaining 1/2 cup candied ginger. Let stand until icing has set, about 15 minutes. Cut into 2-inch squares. Bars can be stored in single layers in airtight containers at room temperature up to 5 days.

30.11.09

Spicy Prawn Spaghetti


Since I didn't go grocery shopping I had limited ingredients to really whip up anything!!! I remembered I had prawns in the freezer and spaghetti stored in the pantry so I whipped up this delicious spicy prawn spaghetti!! It only takes about half an hour to whip up ...its quick, easy and very tasty!

This will serve about 4 people

Spicy Prawn Spaghetti

You will need:
  • 2 tbs olive oil
  • 1 pack of thick spaghetti
  • 20 prawns (divide 5 for each person)
  • 1 onion diced
  • 2 cloves of garlic
  • 1 - 2 tbs of sambal oelek relish
  • 1 - 2 tbs of tomato paste
  • pepper
  • herbs (mint, parsley, basil etc)

Instructions:

Firstly in a pot, cook pasta according to directions or until al dente and drain

In a pan, add olive oil, garlic and onion and saute. Add prawns. Cook the prawns until it changes colour. This will take about 1 minute each side. Remove the prawns. You do not want to over cook them.

In the same pan, add the spaghetti, sambal oelek relish, tomato paste and pepper. Mix through until the sauces coat the spaghetti. And add the prawns to heat through again.

Divide spaghetti and 5 prawns on each plate. Garnish with herbs and serve immediately

29.11.09

Eid-Al-Adha Celebration

A couple of days ago I was invited to a lunch celebrating Eid-Al-Adha عيد الأضحى which is in Islam - Festival of Sacrifice. The day is elebrated by Muslims worldwide to commemorate the willingness of Ibrahim to sacrifice his son as an act of obedience to God (http://en.wikipedia.org/wiki/Eid_al-Adha). And I think they sacrifice a goat too during that celebration.

Going to the lunch was a pretty good experience for me. I was greeted by Muslim women - some wearing hijabs and some wearing traditional Indonesian outfits. The food was so different I needed to try every bit of it! The food looked different from what I cooked and surprisingly it wasn't really spicy at all! I really enjoyed the Beef Rendang which wasn't too spicy and the beef was so tender and juicy! Since it was halal it was so fresh!! And I had a lot of other things but I don't know what their names were lol.....I had the women that cooked the food repeated the names of the food again and again but still I forgot! lols.

Some pics (taken with my really old point and shoot camera):

The food inside. There was more outside!


Beef Rendang. I think this was the best out of all the dishes I tasted.


Coconut chicken. And see the white parcels? Those are rice blocks. You cut them up into cubes and you eat it with beef rendang. But I rather it with just steamed rice.


Cold jelly cup. This was just plain milk mixed with palm sugar and canned fruit like lychee, logan, jellies etc.


Assorted cakes - cassava cake, glutinous peanut rice cake, pancake with peanut chocolate paste and pandan cake which I am familiar with.


This is spicy fish with peanuts. Pretty fishy and salty!


Overall, I had a good day and it was a good experience too see how Muslims celebrate their religion. Lots of food, drink and conversation. I enjoyed it. At the end of the lunch the woman gave away pretty much all the food! That was a bonus! I didn't need to cook on Friday night! I think I am going to make the Beef Rendang it tasted pretty good!

27.11.09

Che Choui (Banana Coconut Tapioca/Sago Pudding Dessert)


 Hello! Thank goodness it's a Friday!! I was meaning to post this up the other day but I was too busy getting ready for the Britney Spears Australian Circus Tour the other night and too tired to do anything afterwards! I had a wonderful night! I got the ticket from my long time friend as an early xmas present! She's such a sweetie! As for now as a small thank you gesture I made her: Che Chuoi (Banana Tapioca/Sago Pudding Dessert) and a dozen of the Porteguese Custard Tarts.


Che Chuoi or Banana Coconut Tapioca/Sago Pudding Dessert is a popular Vietnamese dessert usually sold by street vendors in Vietnam as a cool quick snack. Here you will find this dessert in front of the counter at most Asian grocers. You will find these fresh warm desserts on Saturday morning but then when cooled it will set and go thick instead of a smooth runny consistency like custard when hot. The dessert is usually sprinkled with granulated roasted peanuts and roasted sesame seeds. Other toppings may include sliced mango, pineapple or fresh fruit but personally I just like it simple!!! You don't want to mix too much stuff in it otherwise you can't taste the main ingredient - the bananas. The ingredients are minimal. You only need a few.


Che Choui (Banana Coconut Tapioca/Sago Pudding Dessert)
Serves 6 to 8 people.

Ingredients (you can get these at the local Asian Markets e.g. Inala, Sunnybank or even Woolworths! Sago is in Woolworths in the pudding/canned fruit aisle)


  • 1 cup tapioca pearls (or sago too)
  • 1 to 2 cups for water
  • 3/4 to 1 cup of white sugar
  • drop of vanilla essence
  • 1 can (400g) of coconut milk
  • 3 bananas sliced side ways (you can use any banana's but lady finger's are preferred)
  • extra water

Instructions


The first step is to place the tapioca pearls in a bowl or plastic container and cover with water for at least 1 to 2 hours. It should double in size and fluffed. After 2 hours, in a pot add a bit more water and cook the pearls on med high heat. It should look transparent and feel jelly or gummy. Don't over cook cause it's still going to be cooked in the coconut milk.

the tapioca pearls should change from solid colour to transparent and double in size.


the tapioca pearls cooked - should look transparent and feel gummy

Secondly, mix in the coconut milk, sugar, vanilla and put low to med heat until you see bubbles coming up. Stir until sugar is dissolved. Then add the sliced bananas into the mixture and cook for another 5 minutes or less until you smell a banana aroma. Be careful not to break up the bananas otherwise the pudding will look mushy. Leave for about 15 minutes.

Lastly, leave to cool and eat warm sprinkled with peanuts and sesame seeds.


You can have it cold as well. It's refreshing and cool for summer. I like ladle the pudding into individual plastic Chinese takeaway containers and pop them in fridge for 2 hours. When cooled the consistency of the pudding gets thick soft jelly like consistency and not runny when hot.


cold Banana Tapioca Pudding Dessert topped with peanuts and sesame seeds.

Easy wasn't it? You should try it! I know most Asian desserts look ugly but hey it tastes great! Better than a chocolate bar!


25.11.09

Kim Lan Vietnamese & Chinese Restaurant @ the Valley, Brisbane

Kim Lan Vietnamese & Chinese Restaurant @ the Valley Brisbane is one of the best Vietnamese / Chinese Restaurants I have ever been to. My first step into this cosy little restaurant was back in the old days while I was still a student attending QUT. Every single Friday my friend and I would treat ourselves to cheap and tasty meals here. We made it a permanent ritual. It's not far away from the City (5-8 minute bus ride) and within student budget, we could order a main meal and a dessert! I think costing me about under $13 at the time. They always keep their prices low to suit everyone! The restaurant is only about a 5 min walk from Brunswick Station too! So it is pretty convenient.

The restaurant is tucked away in the inner street.
photo courtesy of truelocal.com.au

When you walk inside, you will feel a nice relaxed atmosphere, turquoise walls, traditional paintings and onto the side a big mirrored wall so you can check yourself out (lol) while waiting to be served and your order to arrive. You can either buy your drinks but often they will give a complimentary black tea or cold water. Which is great! Music played in the background would be typically Chinese music (I have never heard any Vietnamese) like Jay Chou, Twins, and Andy Lau. The service is efficient and friendly. Ever since dining in this restaurant there is no problem of service. Well except one waitress that worked there who was pretty impatient and never smiled but the good thing is that she is not there no more!

I usually order the barbeque duck or pork with steamed green vegetables on the side with soy however, the pho and the deep fried ice cream always gets me!

Best Pho in the Valley!

This is the best pho in the valley! It's pretty almost like the Thanh Phu's Pho. This one is a lot deeper in flavour and darker in colour and it's usually loaded with more broth. Served with the meal is the usual - fresh garnishes like thai basil, mint and lime. Sauces include fresh chili, hoi sin and chili sauce. I would be so full after this meal but.....I always have room for this delicious fried ice cream with my favourite topping - Caramel! When served it's hot, buiscuit-y, coconut-y and crunchy. One bit into it you will find yourself indulging into the caramel saunce, into the warm sweet top layers with the rough crunch and then slowly devouring into the cold vanilla ice cream. Oh I am in heaven!


Best deep fried ice cream

I am thinking going back here again. I haven't been since finishing university! I know a long time ago. The food is cheap, the service is quick, the music sounds good to my ears and they have the best fried ice cream and pho here!

If you want to get here I recommend to catch public transport because if you are thinking of just going to dine don't drive the car cause there is no free parking unless finding off street parking which will take ages to find! Park is I .. think $10 to park at the parking lot since I last been there.


Overall rating:

Affordability: CHEAP!
Eftpos/Credit card: Mastercard, Eftpos, Cash, Visa

Food: 8
Ambience: 6
Service: 8.5
Value: 9

Open: 7 Days Lunch and Dinner
Menu costs: Mains under $20
Takeaway: Yes

Address:
Shop 5, 12 Duncan St, FORTITUDE VALLEY, QLD, 4006
Phone (07) 3852 1878

Kim Lan on Urbanspoon


View Larger Map

24.11.09

Thanh Phu Restaurant @ Darra, Brisbane

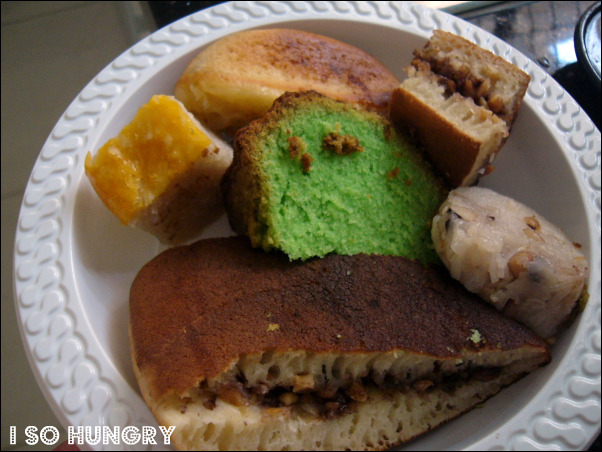
Thanh Phu Restaurant at Darra, Brisbane has got to be one of my favourite family owned restaurants for Vietnamese cuisine! It's pretty convenient since its just about a 2 minute walk from Darra Station and right next to an ATM. It's placed next to the local Vietnamese dvd store and the cheap hairdresser. You can't miss it. Car park can vary sometimes. It's pretty small because people come in and out from the laundromat. There is parking available across the street and off side car parking is available.


View Larger Map
Thanh Phu Restaurant, Darra


The thing I like about Thanh Phu is the friendly service they offer. The food is good for value, the waiters are friendly and most importantly the food comes out efficiently. While you are waiting the owner would come out and have a bit of chat. And after being a loyal customer he will talk to you more and maybe take off $1 off the order lol. Not much but at least it keeps people happy!


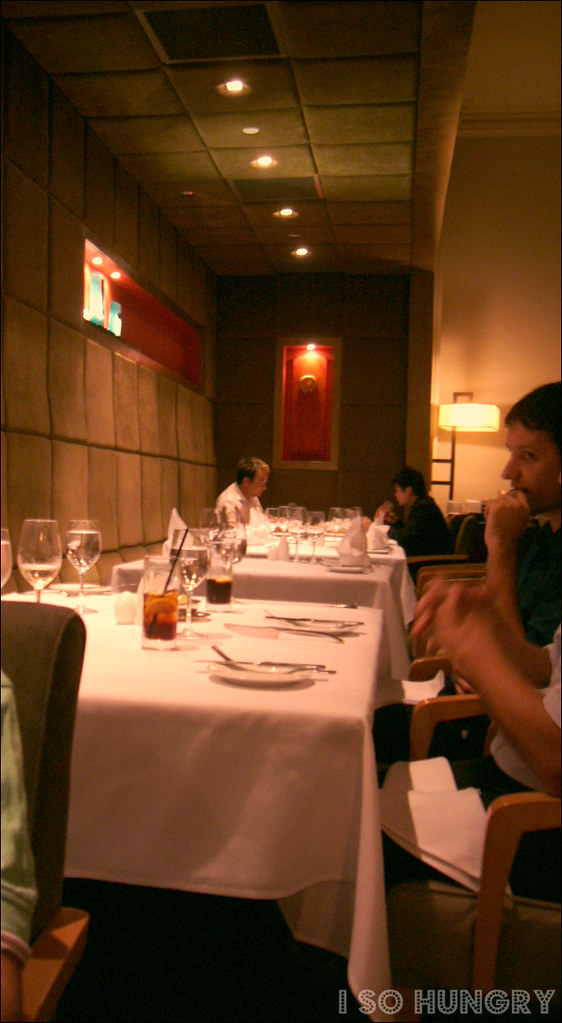
The entrance (main area) and the room next door


There are two parts of the restaurant. One is the main dining area around 15 tables (? I don't remember) for customers and there is one next door which consists a small room usually seated with old Vietnamese men prying out on attractive girls that walk towards the restaurant. Who knows? lol. I think it's a special booking room if you want to have dinner away from other customers. However, I always see old Vietnamese men drinking iced coffee and playing cards and they all look out of their area to see who is the next customer lol. What can I say? It's a pretty sociable restaurant!

When you walk inside you will notice the reception immediately with the golden cat greeting you on the way in. The interior and decor is reasonable with traditional paintings of Vietnam girls and the back wall backed with a huge mirror giving the illusion that the restaurant is big. The one thing that stands out is the large carved map of Vietnam hanging adjacent to the reception showing the Northern, Central and Southern Vietnam. Of course there will be music playing in the background and what is it you ask? Typically Paris by Night (vietnamese music variety shows on dvd).

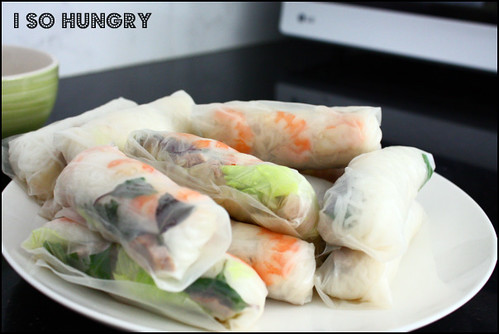
The place can be busy and sometimes quiet. I noticed that the place has an eye for Westerners that come in and enjoy food that I can make at home easily like the famous rice paper rolls. I don't know but Westerners really do enjoy wrapping up rice paper rolls hehe. I remember seeing this large tradie man eat a full course meal and the waiter said "moite don't you think you have enough to eat" worried that the customer might of over eaten lol. This customer I will see all the time in this restaurant. A loyal customer I suppose.

The food that my partner and I usually order is :

  • Phở (Beef Noodle Soup),
  • Hieu Tieu Thap Cam (combination noodle soup) and
  • Cơm tấm (combination rice).

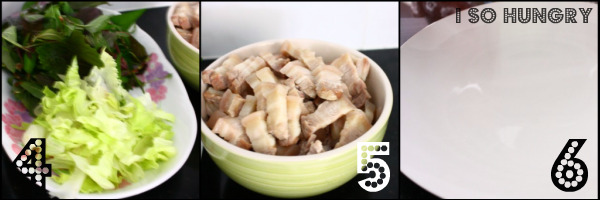
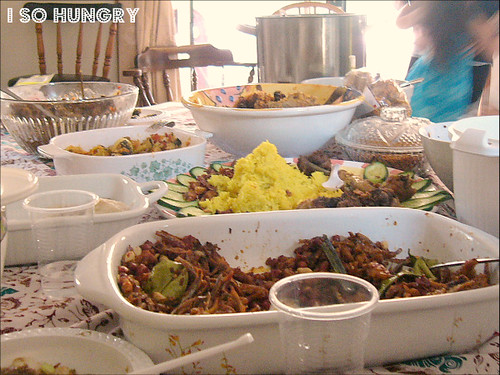
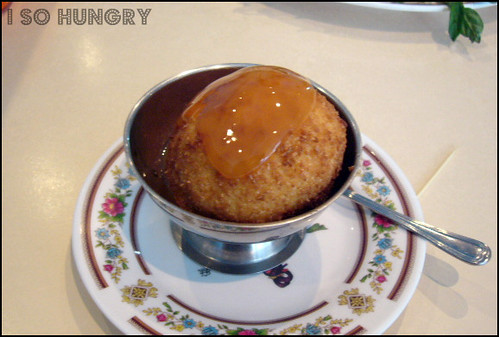
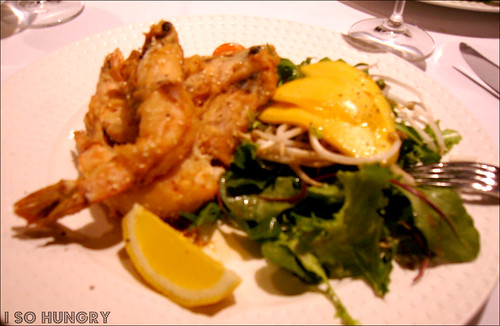
The photos below are taken from the restaurant itself! Looks good doesn't it?

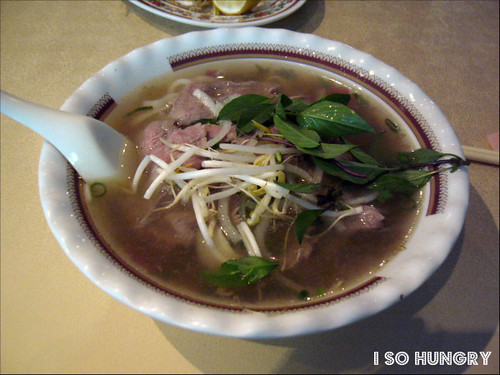
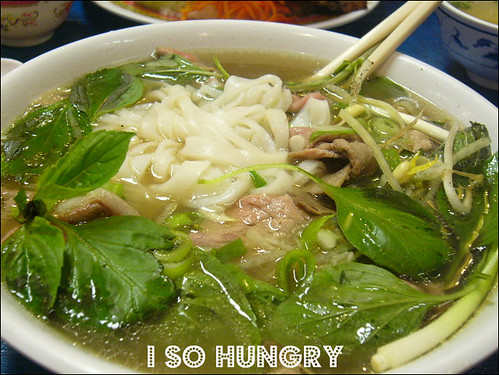
I have got to say this is the best Beef Noodle Soup. It's not too too salty like the others I have tried from other places. The one in the photo is just a normal beef noodle soup that only has the beef slices and balls in it. You can order Special Beef Noodle Soup (Phở đặc biệt') that consists of chewy tendons, meat balls, brisket and tripe. Usually pho is served with garnishes such as fresh bean sprouts, Thai basil, chili and lime. You can also add some hoi sin sauce into it as well. Yummy.


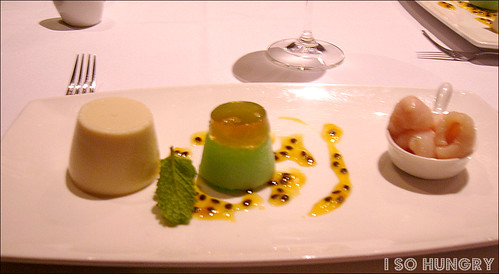
The photo below is called Cơm tấm is basically broken rice which has a weird texture....grainy and chewy and not sticky like normal rice. However when served on a big platter with fried pork, egg, vegetables, shredded pork fat and tofu fish cake or pork meat loaf you will be in heaven! Sweet chili dipping sauce is on the side so you can pour over the grilled pork, egg and rice. Eat in combination with the vegetables and the grilled pork. Very tasty! Notice that there is a fork in a photo and not a chopstick? Well you don't eat this food with chopsticks only the fork and the spoon :).


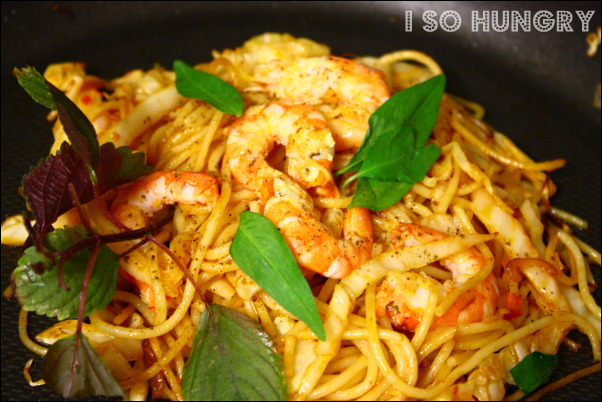
Lastly and not least is my favourite noodle dish of all time (well next to pho lol). This is called Hieu Tieu Thap Cam or Combination Noodle Soup which is a clearer soup than pho and much lighter. I unfortunately tried to make once but turned out to be a noodle soup disaster! So I rather go out and pay under $10 for this dish to satisfy my craving. You can either have the soup with hieu tieu noodles (thin noodles they are not vermicelli noodles or the cellophane noodles), with thin egg noodles or you can have a combination. I like mine combination!

The soup tastes a bit sweet and savoury at the same time. The photo below is combination noodle soup (seafood and meat). It's surrounded by herbs, loaded with noodles, floating crunchy pork fat (the flavour pops open in your mouth), fish cake slices, bbq pork slices, 2-3 prawns and fried minced pork. Mmmmm. This is the best combination noodle soup in Darra. The one at Kim Thanh (which I will review next time) wasn't as nice as these noodles....


I like to finish all my dishes here with their infamous Vietnamese Iced Coffee or young coconut juice.

I have always been going to Thanh Phu not because of it's food but importantly it's service and smile. That what gets me back! I am thinking of going there again soon!!! I haven't been there for months~!

Overall rating:

Affordability: CHEAP! Anyone can afford this kind of food. Good for value, traditional and delicious!

Food: 8
Ambience: 7
Service: 8.5
Value: 9

Open: Lunch to Dinner
Menu costs: Mains under $30
Takeaway: Yes

Address:
136 Darra Station Rd,
Darra, QLD 4076


Contact:

Phone: (07) 3375 9999


Thanh Phu on Urbanspoon


View Larger Map

Vietnamese Chicken Congee

Congee is a rice porridge and comfort food (usually eaten for breakfast) is commonly eaten in Asian countries such as China, Vietnam, Thailand, Japan, Korea, Philippines, Burma and India just to name a few. It is also called Poor Man's Food or Sick Man's Food is because you only require about 6 parts water and 1 part of rice and may be eaten when one is sick since it is easy on the digestive system.


Each Asian country has its own variations when cooking rice porridge. Congee made in different countries use different type of rice with different amounts of water resulting in a thicker or looser type of congee consistency. Popular flavourings consist of salt and pepper, garlic or ginger, fish sauce and pickled stuff. In Vietnam, rice porridge is simply called cháo cooked with sometimes pandan leaves, garlic and sometimes ginger. The popular kind of cháo in Vietnamese culture is when they add pig or duck's vital organs such as heart and liver. I just prefer cháo cooked just cooked chicken. In China, they like their congee with salted duck egg, one century duck egg, tofu and other fermented foods.

My mum and dad used to make chicken congee when I was sick and it did make me feel a lot better and recovered. And if it was the main meal of the day mum would add special types of food into it like the chicken/pork organs and to give it more of a bulk and colour mum would add in mung beans.

Today I will be showing you how to make my version of Chicken Congee or Chicken Rice Porridge

Vietnamese Chicken Congee

Ingredients:

For the broth/stock
  • 2 to 3L water (i added 4 because i like my congee loose)
  • 1/2 kg of chicken pieces (thighs/drum sticks etc)
  • 1 piece of ginger peeled and cut into thin strips
  • 3 cloves of garlic chopped

For the Congee

  • 1 cup of jasmine rice (rinse and drain well)
  • fish sauce
  • salt and pepper to taste

Garnishes (optional)

  • shallots
  • fried onion
  • fish sauce or soy sauce
  • pickled stuff
  • mint, thai basil leaves (any herbs)

Directions

Firstly in a big stock pot, put the garlic and ginger in a 4 litres of cold water and boil and them let simmer. Add the chicken to cook for about 20 minutes or under cooked through. Check it but taking one chicken out and cut through with a knife. When it's cooked remove the chicken. I like to put cold water over the chicken to stop the cooking process because you do not want to chicken to dry. Leave to cool and shred meat and off the bones and leave aside. Put the stock onto medium high.


The next step is to rinse and drain the rice. Then add the rice into the stock and cook until rice is broken. This will take 2 hours to cook. Add 3 to 4 squirts of fish sauce (depending on you), salt and pepper to taste.

Ladle the congee into soup bowls and top with the shredded chicken, herbs, shallots, pickled stuff and the fried onions. You can add an additional squirt of fish sauce if you like :).

That's my version of congee. Hope you enjoy! Maybe next time I will make century duck egg with congee :).

23.11.09

Sticky Rice Balls in Ginger Syrup

I looked through my old photos and came across my food photos of a particular dessert which is popular throughout Vietnam. It's called Sticky Rice Balls in Ginger Syrup or in Vietnamese - Chè Trôi Nước. It can be unfilled coated with coconut or can be filled which can vary. It can be either red bean paste, mung beans, taro, rock sugar, or black sesame filling. The ones I made a couple of years ago contained an easy peanut butter sesame filling. Yes, it was a strong peanut butter taste, it's quite sweet but I love it!! These dumplings can be served hot or warm. When eaten warm, it's chewy and it bursts out with the filling in your mouth and the warm ginger caramelly syrup just tops off the flavour. It can be topped with sprinkles of toasted sesame and some coconut milk. Very delicious.

sticky rice balls in ginger syrup

Get someone to help you since it is quite hard work if you are making a lot! I used my little sister to help me and in return she had some of my dessert lol. This is going to take you about an hour or so because of the steps --- the rolling of peanut butter filling balls, the making of the glutinous rice flour and coconut milk dough and filling the balls with the filling. And then cooking it. Sounds long but worth it at the end. Oh yeah, you can easily buy glutinous rice balls in ginger syrup (usually with mung bean paste) at Inala or Darra on Saturday morning for about $2 or so. But you only get like 3 big balls with mung bean paste and the rest are small unfilled balls. It's worth the value because think of what the person has to go through making the end product for only $2? :)

Peanut Butter filled Sticky Rice Balls in Ginger Syrup
Makes about 20 balls serves about 4 people depending how much they eat :PThis is my version I have alternated to suit me :) and I have made more than 20 balls. You can buy all the ingredients at your local Asian supermarket. You can also find these ingredients in you Coles or Woolworths Asian aisle.
You will need:

Glutinous Rice Balls
  • 4 tbs of crunchy peanut butter
  • 3 tbs of icing sugar
  • 5 tbs of roasted sesame seads
  • 1 pkt/ 400grams of glutinous rice flour
  • 1 can of coconut milk

Syrup
  • 1 piece of julienne ginger (cut in match sticks)
  • 100 - 150g of brown sugar
  • 1 orange or lemon peel (optional)
  • 4 cups water


Directions:


steps 1, 2, 3

1. In a bowl mix up peanut butter and icing sugar. Roll in small ball pieces. Use water so the peanut butter won't stick to your hands. After rolling into small balls you then roll it into the toasted sesame until well coated and then chill til firm. This will make it easier for you to handle and won't be sticky. This is the filling for your sticky ball.

2. The next step is to mix the flour with the coconut milk to form a soft dough. Now I never measure the quantities so the consistent should be of play dough. Slowly mix about a 1/3 of the coconut milk gradually into the flour and mix until you get a play dough like consistency. If the dough is not pulling together slightly add more coconut milk until you get a soft dough.

3. Now with the dough, take a little in your hand and roll it into a ball double the size of the peanut filling. Indent it with your thumb. Now place the peanut filling in the centre and pinch to enclose the filling. Then gently roll the ball between your hands until it forms into a ball making sure the filling is enclosed. Repeat with all of the ingredients. If you find that you have a lot dough left over just make it into smaller balls with no filling.


steps 4, 5, 6, 7

4. The next step is to cook the rice calls into boiling water . Drop each on carefully...they will sink to the bottom but then after about 5 minutes the balls should rise and float to the surface. You know this is ready.

5. To prepare the syrup, you just need to boil the ginger, brown sugar and mandarin orange peel together until the sugar is dissolved. Boil it on 4 cups of water.

6. For the syrup, in a pot dissolve water, sugar, ginger and peel until it goes all syrupy.

7. Finally, ladle balls into small bowls with the syrup and serve with toasted sesame seeds and drizzle with coconut milk

Note: to best store is to leave it out never in the fridge because what you would find is that even though you will get a nice cold syrup the balls will harden and it will not taste really good! Store them in an air tight container and consume them in 1 to 2 days.

Marco Polo Dining Cellar Martini Bar @ Brisbane

I spent my Sunday night at Conrad Treasury Casino not for the gambling lol but for the exquisite food and since my grandma is a platinum member of Conrad, I simply became her guest. This allowed me to access all the white gold suites and lounges in the casino that non-members couldn't. Boy was in for a fun ride :). Drinks and food on the house! Hanging around with my grandma was so fun!

At 6pm we headed to Marco Polo (international cuisine) which is claimed to be Brisbane's best five star restaurant. Evidently the sign pretty much said it all. It achieved Best Restaurant in Australia Accomodation Division for Excellence. The entrance boasted a huge wine cellar with over 300 wines on the menu behind an enormous glass window. I took a step back. Of course I didn't order since I do not drink wine. While grandma was having a quick chat with one of the friendly well groomed waiters I peeped inside the area and admired how beautiful and contemporary the restaurant felt - quiet chatter among guests, warm dim lights, contemporary decor, creamy, red and chocolate colours, and the pretty moss green fabric chairs and matching wall backing.


We were seated down by an exceptional and skilled waiter, had a quick chat and took our orders. I had a look at the dining menu and the food was basically Asian and European. The Asian food I can pretty much whip it up by myself at home however looking at the price at the Peking duck (with pancakes and shallots) was $130 between two people. Did I have a heart attack or what? Probably because I can buy a whole Peking duck at Sunnybank for $25. That food is for the high rollers! lol. Well I have to try this Peking duck next time when I am earning a 6 figure income to see if it's worth the price :) or maybe when I have a big win? lol

Flipping through the menu there were traditional food that you would find at other award winning restaurants. The first food on the list that caught my eye for my main course was the Sesame King Prawns with chili and honey glaze for $32. For the dessert I ordered Marinated Lychees in Iced Jasmine Tea with Mint Sorbet for $14 since I wanted something fresh, cold and sweet. Now I didn't order an entree since I knew I would be so full that I couldn't eat my dessert!

The food came about 15 minutes later after having a complimentary warm bread and garlic butter. Pretty efficient service!

Sesame King Prawns with chili and honey glaze for $32.

The Sesame King Prawns with chili and honey glaze was enormous! Plated was 4 crispy battered king prawns, with a side of salad and slices of mango covered with a tangy sweet kind of dressing. I ate the the whole lot well besides the heads and tails lol. It was pretty good although I would like to see more dressing from the glaze a bit more and maybe add one more prawn to live up to the price :).

Next was the dessert Marinated Lychees in Iced Jasmine Tea with Mint Sorbet. Oh now I was excited! I initially thought the whole dish was going to be in one big bowl with lychees and sorbet but it was presented on a long plate and each piece of dessert was placed beautifully on it's own. Now I didn't expect a creamy coconut jelly thing (left in photo below) but my goodness it tasted just perfect - not too too creamy and not overly sweet. The mint sorbet was nice and refreshing! The downside of this dish was the lychees.....it tasted like it was from a can of lychees that I would buy from the local Asian markets for $2.50 a can or from a lychee tea drink. Overall the dessert was good mixed with the creamy coconut milk jelly and the tang of the passion fruit sauce.


Overall the experience at Marco Polo was a good one. Next time when I come back I will try their Seafood range and maybe order and side or two? :)

Overall rating:

Affordability: Okay if you were on my wage - I would be going once a month. But if you are a high roller :)..you can devour this kind of food every week. It's pretty expensive.

Food: 8
Ambience: 8
Service: 8
Value: 5

Open: 6pm-late, seven days.
Menu costs: Entree $21-$27; mains $22-$41; and dessert $15-$19.

Address:
Level 2, Treasury Casino
Queen Street
Brisbane QLD 4000

Contact:

Tel : +61 7 3306 8744
Fax : +61 7 3306 8687
Website: Marco Polo Dining Cellar Martini Bar
Marco Polo Dining Cellar Martini Bar on Urbanspoon

20.11.09

French Sweet Bread

After having sweet bread last week made by the local Vietnamese bakery at Darra (Brisbane) I was craving for some more. I wanted to make a normal type of sweet bread that's wasn't too hard to make. So where do I find such a recipe? On google of course......derr lol.

I googled "sweet bread" and Blue Barn Bulletin came up as the most popular searches for sweet bread. It was french sweet bread. I thought okay then let's try it. I had all the ingredients in my pantry read to mix up! I didn't have a bread mixer I just kneaded the dough manually by hand and like her, I doubled the ingredients up to make more. I like to use all the space in my oven when it's on. It's such a waste of energy to leave empty spaces in the oven while just cooking one thing! I let it rise for about an hour and then about half an hour again when the dough was in it's plats. I baked it at 170C and for about 25 - 30 minutes. It was browning early. I guess it was probably my oven.


When it came out it smelt delicious even though it looked like it was too too brown lol. I only had it in for 20 minutes. But that's okay, next time I have to keep watch! I didn't tell you that I did add sultanas and coconut just to be creative! I left 2 breads plain. It was good but I think I will put more another 1/2 cup of sugar and some vanilla essence in next time because I am such a sweet tooth! I guess this bread is not suppose to be too too sweet hey?


French Sweet Bread
adapted from Blue Barn Bulletin

Makes TWO loaves(?) / plats. DOUBLE INGREDIENTS TO MAKE FOUR like me :)

  • 1 package dry yeast
  • 1/4 cup lukewarm water
  • 1 cup milk
  • 1 egg
  • 1/2 cup sugar
  • 1 teaspoon salt (I omit the salt unless using unsalted butter, then use 1/4-1/2 teaspoon)
  • 6 tablespoons melted butter
  • 4 cups flour (4 to 4 1/2 cups total)
  • 1/2 teaspoon cinnamon

1. Dissolve yeast in water. Heat milk to lukewarm. In a different bowl, combine egg, sugar, cinnamon and salt, if using.
2. Add yeast, milk and 4 Tablespoons butter and mix again. Add flour gradually till it can be gathered into a soft ball. Blend in remaining flour with fingers.


3. Turn out onto lightly floured surface and knead until smooth and elastic. Use remaining butter to keep fingers from sticking. Don't use any more flour.
4. Place in lightly oiled bowl. Cover and let rise in warm place until doubled. Punch down and knead a few times. Divide in half, then divide each half into 3 pieces and roll each piece between hands into a long rope.


5. Braid ropes from middle, pinching ends together. Form into ring if desired, place on oiled baking sheet.
6. Cover and let double. Bake at 350º F for 30-45 minutes.


ooppss a bit brown!! but still tasted good! doesn't taste burnt thank goodness! hehe......it smelt divine! It was so yummy with butter and jam :).

Thanks to Blue Barn Bulletin for sharing this wonderful recipe :)