About

Pages - Menu

Showing posts with label recipes | baked stuff. Show all posts

30.4.11

Thin and Crispy Oatmeal Cookies {revisited}

Thin an Crispy Oatmeal Cookies (with a hint of saltiness)

It has been since 2009 I made these delicious Thin and Crispy Oatmeal Cookies and while I was baking the chiffon cake (previous post), I wanted to fill up the second shelf in the oven with these cookies.   I had all the ingredients I needed plus the load of butter in the fridge that was sitting there for weeks.

These cookies are great if you are into a crispy edge, crunch and a moist middle.  However, when reading the ingredients on Cooks Illustrated it says to use 14T of butter and when I converted it to grams it ended up to nearly 200grams of butter which is a bit much?  But I digress :).  I don't care cause butter sometimes makes food taste good :).


14t equates to approximately 200grams.  For conversion go here

I made about 24 to about 28 cookies off the Cooking Illustrated recipe and this time my cookies are a bit more flatter than the last ones I made in 2009 which were a bit thicker.  If you want the cookies to be real thin you would have to press the dough ball down further to about 1.5cm (not 2cm) and with a fork (I find it better) and bake for a further couple of minutes.

Cookies can last for three days in an air tight container and still maintain their crispness the day after - that's if the dough ball is pressed down pretty thin before baking and baked a bit longer.

You can add raisins, choc chips or nuts if to give it a bit more variety.
Thin and Crispy Oatmeal Cookies
by Cooks Illustrated

  • 1 cup flour
  • 3/4 tsp baking powder
  • 1/2 tsp baking soda
  • 1/2 tsp salt
  • 14 T unsalted butter, softened, but still cool (65 degrees)
  • 1 cup sugar
  • 1/4 cup light brown sugar
  • 1 large egg
  • 1 tsp vanilla extract
  • 2 1/2 cups old fashioned rolled oats

1. Adjust oven rack to middle position and heat oven to 350. Line 3 large baking sheets with parchment paper. Whisk flour, baking powder, baking soda, salt in medium bowl.

2. In standing mixer fitted with paddle, beat butter and sugars at medium-low speed, about 20 seconds. Increase speed to medium and continue to beat until light and fluffy, about 1 minute longer. Scrape down bowl with rubber spatula. Add egg and vanilla and beat on medium low until fully incorporated, about 30 seconds. Scrape down bowl again. With mixer running at low speed, add flour mixture and mix until just incorporated and smooth, 10 seconds. With mixer still running on low, gradually add oats and mix until well incorporated, 20 seconds. Give dough final stir with spatula to ensure no flour pockets remain.

3. Divide dough into 24 portions, each about 2 T, then roll between palms into balls. Place cookies on prepared baking sheets, spacing them 2 1/2 inches apart, 8 dough balls per sheet. Using fingertips, gently press ball to 3/4 inch thickness.

4. Bake 1 sheet at a time until cookies are deep golden brown, edges are crisp, and centers yield to slight pressure when touched, 13 to 16 minutes, rotating sheet halfway through. Transfer baking sheet to wire rack;cool cookies completely on sheet.

Poh's Orange Chiffon Cake {inspired}

My Chiffon Cake inspired by Poh's Orange Chiffon Cake Recipe

Chiffon cake.  I love this cake but every time I attempt to make it again it makes me nervous.  The reason?  Well I have had epic failures baking the chiffon cake.  How many failures?  FIVE times.   During these five times the chiffon cake either collapsed or was really wet inside.  When making this cake again today,  I thought to myself if I fail once again after five times I will really throw out that chiffon cake tin and scream my lungs out.   I was persistent to be successful this time - I measured correctly and took care with the way I folded the egg white mixture into the egg yolk mixture.  I really suck at baking but I felt so much victory today because of this cake! :).  Thanks to Poh's Orange Chiffon Cake" recipe I am pretty happy.

While watching the segment  I noticed that she did a couple of things quite differently from the written recipe.  She tipped her egg yolks in the flour mixture instead of the beating the egg yolk with sugar til light and fluffy (like a commenter on the board noticed).  Also when she 'folded' both egg and egg white mixture she mixed it gently with a whisk (to incorporate more air) not a spatula.  I did these two steps and my chiffon cake turned out airy and moist and did not collapse.  It did rise more than other times I baked chiffon cake!  I was a very happy girl today.

Cake wasn't high since I used a 25cm tin instead of a 22cm tin

I used a 25cm angel cake food tin that I bought from Matchbox in Brisbane for around under $30.  They didn't have any smaller so I opted for the bigger cake tin.   This is why I think my cake didn't rise to a complete height.

Finished product

Also instead of using Poh's ganache recipe (I am not a very big chocolate fan on cakes), I opted to dress up the whole cake with whipped cream, toasted desiccated coconut and used macadamia nuts instead of hazelnuts.


Cutting in three layers was quite hard.

Since my cake wasn't at full height cutting it in three layers was quite hard!  It wasn't as straight as Poh's but nevertheless it wasn't quite noticeable :).  It did give the cake extra height but I wished that I could of made more whipped cream to make the cream layers thicker! 

The verdict?  It was so yummy!  The orange citrusy flavour went well with the coconut!  It was very light and airy.  I am so going to make this again in a few more weeks and make other flavours like durian :) hehe.


Poh's Orange Chiffon Cake


Ingredients

Serves 8-10
  • 5 egg whites (at room temperature)
  • 1/2 tsp cream of tartar, sifted
  • 1/3 cup (75g) caster sugar
  • 5 egg yolks
  • 5 tbs (100ml) coconut milk
  • 4 tbs (80ml) vegetable oil
  • 1/3 cup (75g) caster sugar, extra
  • 4 tbs (80ml) orange juice
  • 1 tbs finely grated orange zest
  • 150g plain flour, sifted
  • 1 3/4 tsp baking powder, sifted
  • pinch of salt
    Roasted Hazelnuts
  • 150g hazelnuts
    Filling
  • 400ml pouring cream
  • 3 tbs icing sugar
  • 1 tsp vanilla bean paste or natural vanilla extract
    Ganache
  • 150ml pouring cream
  • 200g good quality dark chocolate chopped or broken into small pieces

Method

  1. Preheat oven at 170°C (160°C fan forced).
  2. In a large bowl, beat the egg whites and cream of tartar with an electric mixer until soft peaks form. Add the sugar one tablespoon at a time and beat thoroughly after each addition until you achieve stiff peaks. Set aside.
  3. In a separate bowl whisk egg yolks with extra caster sugar until thick, pale and fluffy. Add coconut milk, vegetable oil, orange juice and zest, flour and baking powder, and whisk until combined. Gently fold the egg whites into the yolk mixture three batches.
  4. Pour into a 22 centimetre angel cake tin. Bake for 30 minutes on the middle shelf, or until a skewer inserted in the centre of the cake comes out clean. Leave the oven on to roast the hazelnuts.
  5. When cake is out of the oven, immediately invert the tin and leave the cake in the tin to cool completely (about two hours).
    Roasted Hazelnuts
  1. Place the hazelnuts on a baking tray and roast for seven minutes, or until the skins are splitting and flakey. Remove from the oven and pour into the middle of a clean tea towel, wrap up and gently rub the skins off. Place the nuts on a chopping board and chop to desired texture.
    Filling
  1. Whip the cream, sugar and vanilla in a bowl until stiff, be careful not to overbeat as the cream will split. Cover with plastic wrap and refrigerate until required.
  2. When the cake is cool and ready to be assembled, run a knife around the edge and base of the cake and invert to release. Slice the cake with a sharp chef's knife into three equal layers. Spread half of the filling and a third of the chopped hazelnuts on each layer.
Ganache
  1. Bring the cream to the boil in a small saucepan. Remove from the heat, add chocolate and whisk until the chocolate is melted and well combined. Place the cake on a wire rack and, using a spatula, spread the ganache evenly over the top and side of the cake and sprinkle with the remaining chopped hazelnuts.


25.6.10

Cooking with Kids: Masterchef Scones


I got this recipe off the Australian Master Chef site which was a previous recipe from masterclass from last year's series.  The recipe is originally dates and lemon but I just added sultanas instead of those ingredients.  Every Friday I have little helpers that are more than eager to help me measure, pour, mix, knead and help me eat the finished product!

These were so good!!!

All you need is:

150ml-175ml milk
150ml cream
1 egg
3 cups self-raising flour
2 tbs caster sugar
1 cup chopped, dried dates
Finely grated rind 1 lemon
Cream & jam, to serve

My little master chefs hard at work!

Method:

Makes 12
1. Preheat oven 200°C fan forced. Line large flat oven tray with baking paper.

2. Whisk 150ml milk, cream and egg together until well combined. Combine flour, sugar, dates and lemon rind in a large bowl. Add milk mixture and stir gently to a soft dough, adding remaining milk if necessary. Turn onto a lightly floured surface and knead gently until dough comes together.

3. Press dough out to 2cm-thick. Cut scones from dough and place onto tray flat-side up. Press dough together gently and repeat using the remaining dough. Brush the tops with milk and sprinkle with a little sugar. Bake 12-15 minutes until golden and well risen. Serve hot with jam and cream.

For a video tutorial head to:http://www.masterchef.com.au/date-and-lemon-scones.htm

18.6.10

Cooking with Kids: Chocolate Chip Oatmeal Cookies


Today the girls and I made chocolate chip oatmeal cookies!  The cookie photo on top is by one of the girl's....she did go over board with pushing the chocolate chips in didn't she?  I am a big fan of oatmeal cookies because of it's crispy texture on the outside and the chewiness on the inside.  However, I don't like how much butter goes into it but that's why it tastes so nice! lol.

 Little fingers hard at work!

What will you need:
  • 250grams of softened butter, cubed
  • 1 cup of brown sugar (I prefer light)
  • 1/2 cup of white sugar
  • 2 eggs
  • 1 tsp of vanilla essence
  • 1.5 cups of plain flour
  • 1/2 tsp of baking soda
  • 1/2 tsp of baking powder
  • 1 tsp of salt
  • 3 cups of oats (rolled or quick oats)
  • 1 cup of chocolate chips
  • Optional:  for more chocolate I just cut up 1/2 cup of a chocolate block in little pieces.

Method:

  • Firstly preheat your oven at 170 C degrees
  • In a large bowl, cream together the butter and both sugars until smooth
  • Then gradually beat the eggs one at a time and then add in vanilla
  • Add all the dry ingredients and combine til well blended
  • Mix in the chocolate chips and chocolate pieces until well combined
  • On a lined baking sheet tray, drop spoonfuls and decorate with a chocolate chip on top (if you want).
  • Bake for 12 to 15 minutes
  • Cool on rack and enjoy!


On a different note:

 Check out what I got delivered last night!  A new masterchef kitchen!  It's got a fridge, an oven, a microwave and accessories and a kitchen sink to wash all the dirty stuff after cooking a big pretend meal lol.

It's not for me really...it's for the kids that cook with me hehehe


10.5.10

Cooking with Kids: Chocolate Patty Cakes

Hello! I am back after a month and something :).   Been quite busy with work and all and it has been so much fun I forget to blog.........but the thing is I have been making the same thing every single week and I guess there is no point to blog about the same thing?


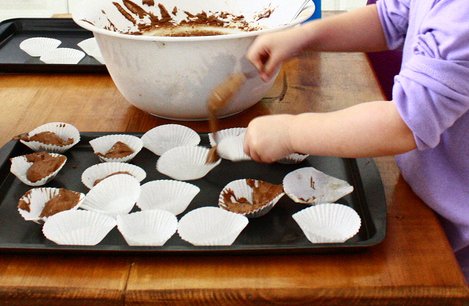
I have been baking with little ones and she is one of them in the photo lol.  Look at her tongue licking the chocolate off her chin!    We were making chocolate patty cakes and these are one of their favourites!!

Look at these girls have skills already! And they are only 2 and half years old :).

 I only helped them with the baking and mixing of the batter.  They transferred all the batter by themselves!!!

I just took this recipe off taste.com.au!  It is called the QUICK MIX CHOCOLATE CAKE.  But I made it into little patty cakes.  And takes about 20 to 30 minutes in the oven.

Ingredients
  • 270g (1 1/3 cups, firmly packed) brown sugar 
  • melted butter to grease
  • 185ml (3/4 cup) milk
  • 125g butter, cubed
  • 50g (1/2 cup) cocoa powder
  • 1/4 tsp bicarbonate of soda
  • 150g (1 cup) self-raising flour
  • 2 tbs plain flour
  • 3 eggs, lightly whisked

  • Chocolate icing

  • 195g (11/4 cups) pure icing sugar
  • 1 tbs cocoa powder
  • 10g (2 tsp) butter, at room temperature
  • 1 tbs boiling water

Nom Nom Nom :)


29.3.10

Puffs (profiteroles)

I made choux pastry again but in puff form today!  They are called profiteroles.  I love these! I am so addicted to them!  This time I covered the top of the buns with chocolate!  I <3 french desserts.   I love it with custard cream filling.  Mmmmmm

26.3.10

Choux Pastry with Custard Cream Filling


Choux pastry is so easy to make than puff pastry!  A million times easier!   Choux pastry is a basic French bun that is used to make with eclairs, profiteroles or croquembouche.  The pastry rises three times its size in the oven which creates this airy, light and crisp texture.    All you need is some basic ingredients that you can find in your pantry and fridge and its just beating the mixture up and then filling it into a piping bag and piping it out onto trays into whatever shapes you like.   Then see it rise from a small ball to 3 times the size!

I had a hard time piping the pastry dough onto the tray because I did not have a proper piping bag!  I instead used a sheet of baking paper and made it into a piping bag and cut the tip to about 1cm.   It worked but then I had to use too much baking paper so I just dropped teaspoons of balls.   This recipe makes about 10 -15 eclair shapes or balls.  Depending how much you put into the shapes.  I attempted to do eclair shapes but I instead did big buns.

Filling the pastry was the best part.  Every single bun was gone in 15 minutes!

You will need:

CHOUX PASTRY


75g of butter
180mls of water
3/4 of plain flour sifted
pinch of salt
4 eggs


CUSTARD CREAM

2tbs of custard powder
2tbs of caster sugar
1 cup of milk
300ml of thickened cream

icing sugar for dusting


Choux pastry.
Preheat over to 240C

In a saucepan, combine butter and water and cook until the butter has melted.  Don't boil.   

Immediately add the sifted flour and salt and stir vigorously until you see a smooth dough ball form.  Take off heat immediately.

Transfer into a small bowl and add 3 eggs (one at a time) and beat with mixer til smooth.  Add the last egg and this will form a nice glossy thick dough  (should be a very very very thick consistency).

Use a piping bag with a 1cm nozzle and pipe small mounds on the tray or just use 2 table spoons to shape large buns.

Bake in the oven for 20 to 25 minutes or another 5 to 10 minutes if you have bigger buns.   When cooked make a hole in each bun to release any steam.  Cause once cooled the buns will go soggy so you need steam to escape.

Cool and set aside.

Next.....

Custard Cream Filling.

Combine the custard powder and sugar into a small saucepan and add the milk on low heat.  Whisk til it goes thick.

Add the mixture into a small bowl.

Cover with plastic wrap to prevent skining.

Refrigerate for half an hour or til cool.

Then in the same bowl add the thickened cream and with a mixer, mix til it goes thick and forms peaks.

Now for the yummy part!

To serve the buns, cut in halfway and then just before serving spoon the custard cream filling and dust with icing sugar!


25.3.10

Choclate Cream Puffs


Hi guys! I have been away for a while!  I have been working on this huge project so I haven't had time to really cook something special until yesterday!

I love love love pastry desserts and especially these cream puffs!  They are so yummy you could finish a whole batch under 30 minutes!  You can buy these at bakeries for around $2.50 each depending on the size but I decided to make these at home.  It did take a while but the effort was pretty worth it!

I got this recipe from http://www.tasteofhome.com and it turned out great.  I did not use strawberries since I did not have any on hand but without it tastes as good too.  I am wondering if I should put custard in the puffs next time?

For the puffs I did not cut it in half and put the cream in that way.  I just inserted the cream into the puff balls instead with cream.  Turned out messy though :P.


You will need:

Chocolate Cream Puffs

Ingredients

  • 1 cup water
  • 1/2 cup butter
  • 1/4 teaspoon salt
  • 1 cup all-purpose flour
  • 3 tablespoons baking cocoa
  • 4 eggs
  • 2 packages (8 ounces each) cream cheese, softened
  • 1 cup sugar
  • 2 cups heavy whipping cream, whipped
  • 3 cups coarsely chopped fresh strawberries


Directions

  • In a heavy saucepan over medium heat, bring water, butter and salt to a boil. Add the flour and cocoa all at once; stir until a smooth ball forms. Remove from the heat; let stand for 5 minutes. Add the eggs, one at a time, beating well after each addition. Beat until smooth and shiny.
  • Drop by heaping tablespoonfuls 3 in. apart onto greased baking sheets. Bake at 400° for 30-35 minutes or until set and browned. Remove to wire racks. Immediately split puffs open; remove and discard soft dough from inside. Cool puffs completely.
  • In a small bowl, beat the cream cheese and sugar until fluffy. Fold in whipped cream and strawberries. Fill bottom halves of puffs; replace tops. Serve immediately. 

Yield: 15 servings.

23.2.10

Vanilla Swiss Roll


Hi guys!  I thought I would make some cake yesterday for my student that is staying with me from Japan.  He loves cake and I thought this was an easy plain yet tasty treat for him to munch on for lunch.   He hardly eats cake over in Japan since his mum is quite busy with working in the health field.  So he is munching lots here before he gets back!  I hoping for him to make sushi with me before he leaves this week!  That would be awesome!


Now I just used an easy sponge recipe you can find in my post earlier this year on Vanilla Pandan Mango Swiss Roll.  If you want to make 2 sponge rolls like I did...just double it up!  I added a bit of honey in it as well to make it a honey flavor and made an easy vanilla butter cream to top it off.  If I had fresh cream I would certainly have used it!

To make the butter cream (to thinly paste it on 2 sponge cakes) use about 200grams of chopped unsalted butter and add some icing sugar (according to your sweet tooth) and beat until all smooth and creamy like.  Then at the end add a drop of vanilla essence and beat well.  I got this tip off a online friend of mine named Jack who is a chef by trade (something like that lol).    Tasted very good too!

Then roll it up with a parchment paper carefully and slowly starting from the end of the cake and work up.  My sponge cake did not crack and it shouldn't crack.  If so there is something wrong with the way you folded the mixes in I think.   When finished rolling and looks intact....cut the cake into 2inch thick pieces!  And ENJOY!!

The Japanese student loved it and of course my partner!!  Swiss roll is always easy to make and very easy to please people with :).  And you can put your own kind of variety of fillings to suit your taste and budget too!  Now that's awesome :D


All packed for lunch boxes!

16.2.10

Easy Banana Bread


I love Banana Bread with cream cheese frosting on top!!!   I have used this recipe for a while and I alternate it a bit from time to time when I want something different.  This is a very easy banana bread to make.  It is very fluffy, nice and moist.  It keeps fresh for about a week in an air tight container.

I usually bake 2 loaves/tins to take room up in the oven.    Double the ingredients to make 2 lots.

Banana Bread
  • 1.5C of self raising flour
  • pinch of baking powder
  • 1 TSP of bicarb soda
  • 3/4 cup of sugar
  • 3 medium sized ripe bananas mashed
  • 1/2 cup of canola/vegetable oil (use any)
  • 2 eggs beaten
  • handful of chopped almonds
  • 1/2 TSP of vanilla essence

Method
- preheat oven at 150C
- First grease a ring tin or a loaf tin
- sift all dry ingredients in a mixing bowl
- make a well in the centre and add all wet ingredients
- mix the ingredients together until smooth batter like consistency
- pour the mixture into the tin/s
- bake for 1 hour.  check if done by poking the loaf with skewer.  if it comes out clean then the cake should be done.  I usually bake for another 10 minutes just to make sure.
- cool for half an hour, cut and enjoy!!

Tip:  You can vary this  banana bread but adding your own ingredients in it like different kind of nuts or even chocolate chips, honey etc

12.2.10

Pandan Chiffon Cake

pandan chiffon

 Pandan Chiffon Cake is my favourite cake out of all cakes!  It's light and fluffy texture, the colour and the taste always want me going back to eat more of these!   Pandan Chiffon Cake is very popular in Malaysia, Singapore and Vietnam.  My mum used to buy me a piece of pandan cake at the local Asian market every morning.  It was a treat for me a long with sticky rice and sweet fried breads.

Pandan chiffon cake originates from Malaysia (everything so good originates from Malaysia :P) and is sometimes flavoured from the juice of the pandan leaf and sometimes added with green food colouring to make the colour for vibrant.  I think more these days when pandan leaves are not available the pandan paste or essence is substituted.   That is what I have used in this recipe.

This is my THIRD attempt making pandan chiffon cake.  And this third time I haven't really failed lol.   The cake turned out okay (it broke) but since I don't have chiffon tin (or angel cake tin) so it was hard to take it out.  I have a tin that has a hole in the middle.  I have no idea what to call it but it is not a chiffon tin.  It turned out nice and fluffy!

pandan chiffon
 folding the mixes together

The first 2 attempts both cakes rised up beautifully in the oven but when it was time to take it out and invert it..............it DEFLATED terribly!  It was so disappointing.   I think it was because when I folded the egg white mix into the egg yolk mix it lost air so that could be the problem.  Or maybe I had specks on yolk in the egg whites which ruined the whole recipe altogether!

pandan chiffon
 Broke on the side but hey still turned out great!

Here is the recipe.  I used a tin with a hole in the middle but really I should be using the CHIFFON TIN

Pandan Chiffon Cake
  • 100G of plain flour sifted
  • 1 TSP of baking powder
  • 90ML of coconut cream (don't shake use bottom milk part of coconut tin (scoop out with spoon))
  • 1/2 TSP of vanilla essence
  • 4 egg yolks
  • 5 egg whites
  • 1 TSP of pandan essence 
  • 70g of caster sugar (35g for egg yolk mixture / 35 g for egg white mixture)
  • 1/2 TSP cream of tartar
  • 2 TBS of vegetable oil 
  • pinch of salt

METHOD

  1. Pre heat oven at 175C
  2. In a big bowl cream yolks, 35g of sugar, and vanilla til nice and thick
  3. Add the flour, baking powder, coconut, oil and pandan.  Beat til smooth
  4. In another CLEAN BOWL (has to be dry and not even damp) beat egg whites (with no spec of egg yolk), 35g of sugar and cream of tartar and pinch of salt.  Beat until STIFF PEAKS form.  Over beating is better than under beating the egg white mixture. 
  5. Now carefully and gradually, 1/3 at a time ...fold in the egg white mixture into the egg yolk mixture and fold til combined.  Repeat this until you finished the egg white mixture.
  6. Pour mixture carefully into pan (ungreased) and bake at 175C for 45 minutes or until done.  To check don't poke the cake otherwise the air will escape.  I just touch it and if it springs back properly...it is done - to me anyway. 
  7. Now when it is done ...immediately invert it.  Turn it upside down on a cooling rack so it will hold its shape.  Cool for 3 hours.  Then after that loosen the cake with a knife.  It should fall out easily.  With mine....it didn't cause I only let it cool for 1 hour.  I was very impatient :P.
  8. I hope your cake turns out !
pandan chiffon

update: Monday 15th February.   I tried making pandan chiffon cake again but it FAILED!! It came out all deflated and wet....????  I don't know what happened.  I think the one that I made for this post is my only ONE HIT wonder lol.

6.2.10

Chinese New Year Peanut Cookies / 花生饼


Nearly every year for Chinese New Year (or in my case Vietnamese/Chinese New year) my family would get little gifts from yum cha tea sets, sweets (coconut strips, winter melon strips, dried fruit candy, ginger candy etc) and banh chung (traditional Vietnamese cake consisting of glutinous rice, pork, mung beans etc) and most of all we get tins of these yummy Chinese cookies.

My favourite would be the peanut cookies that has the sesame seeds on top.  It's soft but when you put it into your mouth - it crumbles and you get this sweet and salty taste at the same time.   This peanut cookie is VERY easy to make and I think most of you will find the ingredients right in your pantry!  All you need is flour, some oil, ground peanuts, a pinch of salt and baking powder!  Yes that is right!  That is all you need!  No milk and no butter!  So this is so great for vegetarians :).

I initially got this peanut cookie recipe from Bake Cook Eat but I made some alternations to suit my taste (I just added sesame seeds and added coarser peanuts).  Instead of using the small cap that she has used to shape the cookies, I used a bigger one hence the less cookies I baked.   Traditionally, you will find the cookies will have an indent in the middle and just glazed with a egg yolk wash but I liked it with the sesame seeds. I baked around 30 small cookies!  It looked good and it smelled great.  It was even better when I tasted it.   The first batch turned out very well so I guess for my second batch it is going to be bigger since I am going to share it around with my Vietnamese family and my Chinese family (my partner's side).  I hope they like it.  I feel a bit of pressure here lol.

So here is the recipe from Bake Cook Eat  with a bit of my version in it :)

Chinese New Year Peanut Cookies or 花生饼
Ingredients (makes around 40ish)
  • 3/4 roasted peanuts and grounded
  • 1 cup of plain flour
  • 1/2 tsp of baking powder
  • 3/4 cup of icing sugar (powdered sugar)
  • some canola oil 
  • sesame seeds
  • pinch of salt 
  • 1 egg yolk + dash of water (for egg wash)

Method

Firstly, roast the peanuts in a fry pan until golden and until aroma hits your nose :).  Then let cool.  Grind the peanuts in a food processor until finely grounded.  You can leave some bits coarse.
Then a big mixing bowl sift the flour, baking powder, icing sugar, salt and mix with some oil.  Blend the mixture with clean finger tips until the mixture turns into a crumbly short bread dough or like bread crumbs.  When squeezed together in your hand it should be compressed.  That is how you want it.

The consistency you want

If the mixture is too oily or too floury just add more flour or more oil until you get it right.  You do not want it too greasy or too dry.

Now to the fun part - Shaping the cookie.  I thought this was a really neat idea to shape cute cookies (thanks Bake Cook Eat for the tip!).   Just get any good sized cap for a cute cookie shape and all you have to do is place some cling wrap over inside the cap and then press the dough in tightly.  Then pull the cling wrap to release the cookie shape.  Place the cookie onto a lined baking sheet.


Now to glaze the the cookies.  Mix one egg yolk and a dash of water.  Mix and with a back of a spoon brush with egg wash.  I just used an actual brush to brush it over.  I found it more simple...well for me.


Next sprinkle some sesame seeds over each cookie dough :).


Finally bake the cookies at about to 200°C for about 16 minutes or until golden brown

Let cool.  Share and enjoy!!!


Gung Hay Fat Choy!
 

29.1.10

Strawberry Jam Coconut Slice

Jam coconut slices are one of my favourite treats. I remember buying my first one at a local bakery and it tasted not overly too sweet and not too dry. It was perfect. I have been through a few jam coconut slice recipes and most of them are too sweet for my taste buds. I just cut down the sugar the second time making them. Most of the time the jam is already sweet so you don't need that much sugar in the first place.

I found a coconut slice recipe on taste.com.au and I cut down the sugar to about 1/2 a cup. I knew that 1 cup of caster sugar would be tooo sweet! This recipe is simple and quick and most of the family will enjoy it.....well maybe all of them!


Jam Coconut Slice Recipe
adapted from taste.com.au

Ingredients
  • 2 cups plain flour
  • *** 1/2 cup caster sugar
  • 125g butter, chilled, cubed
  • 3 eggs
  • 1 teaspoon vanilla essence
  • 3/4 cup strawberry jam (ANY JAM)
  • 2 cups desiccated coconut

Method
  1. Preheat oven to 180C. Grease and line a 3cm deep, 24cm x 29.5cm (base) lamington pan. Process flour, 1/2 cup sugar and butter to resemble breadcrumbs. 
  2. Add 1 egg and vanilla. 
  3. Process to form a dough. 
  4. Press dough into base of prepared pan. 
  5. Bake for 15 to 20 minutes, or until light golden. 
  6. Spread jam over warm base. (you will find it easier to spread when the jam is warmed in the microwave for a couple of seconds)
  7. Whisk remaining eggs and remaining 1/2 cup sugar together. 
  8. Stir in coconut. 
  9. Spread over jam. 
  10. Bake for 25 minutes, or until golden. 
  11. Cool completely in pan. 
  12. Cut into pieces. Serve

    27.1.10

    Australian Sausage Roll


    It was Australia Day yesterday and I spent it making lamingtons cakes and sausage rolls with my little friends from Beijing China. They are only going to be here for another few more days and I am teaching and showing them what is Aussie food. Well they certainly enjoyed making and eating the sausage rolls so much! This is because they made it all by themselves. It is great just watching them making these little rolls and how well presented the rolls looked! I am so impressed that I only pretty much taught them how to make it only two times and they picked it up quickly.


    When they were processing these rolls they appeared more confident, wasn't shy trying to speak English to me and they looked so focused! The bigger boy was really focused on his rolls. You can tell which baking tray was his lol. He did also pricked holes into the pastry with the fork! lol.

    Australian Sausage Roll (With Asian Twist) makes 20 rolls


    • 400g of pork mince (might be a bit of left overs)
    • 2 cups of bread crumbs
    • 1 egg and 1 extra
    • 3 green shallots chopped
    • 1 onion diced
    • 3 cloves of garlic minced
    • salt and pepper to taste
    • 5 sheets of store bought puff pastry
    • sesame seeds

    Instructions

    1. Firstly separate puff pastry and thaw. Put in fridge so it won't go soft.

    1. Pre heat oven at about 180 degrees and line baking tray with baking paper
    2. In a big mixing bowl add the pork mince, bread crumbs, 1 egg, chopped shallots, diced onion, minced garlic and salt and pepper. Mix with clean hands and until the mixture becomes all mushy and smooth. You can do this in a processor to make it more sausage like meat if you have one.
    3. Cut each pastry square into squares (4 per sheets)
    4. Put the pork mixture into the middle of the pastry and make sure its leveled and consistent. Brush with some egg wash (from extra egg - whisk lightly in bowl) and fold pastry over and seal. Lift up and turn over onto the opposite direction and place onto the tray. And brush with egg wash on top and sprinkle with sesame seeds. Repeat until you have about 20 rolls.
    5. When you are done prick some holes into rolls with fork and bake for 30 minutes or until golden. (Mine took 40 minutes to bake - i just wanted the meat to cook thorougly for the kids)
    6. Serve with salad and dip with tomato sauce. One of my kids dipped it with soy sauce lol.

    The kids scoffed it down like there was no tomorrow. I told them you don't eat it with fork...just eat with your hands and dunk it in with sauce. And that is what they did. The bigger kid.....oh my goodness........always eating so quickly I am scared that he might of choked. HE LOVED IT. THEY BOTH LOVED IT. Too bad Aussie food is so unhealthy but I just wanted to show them this is Aussie food!


    hold your horses mate! lol

    They are going to enjoy making spaghetti bolognese tonight :)

    26.1.10

    Lamington Cakes on Australia Day

    Today is Australia Day - the day when we get an excuse to have a day off, chuck seafood on the barbie and to eat as much sausage rolls, meat pies, red meat and wash it down with foster or four x beer. Chant Aussie Aussie Aussie oi oi oi and sometimes make a fool of ourselves in front of family and friends! ... Very Bogan LOL. I don't really understand why we do that? I know I don't. It is a time to come together to reflect what is good about being Australian, what is great, how lucky we live in this land, and be proud of what we have achieved. A lot of people today will celebrate becoming an Australian Citizen. I am pretty thankful that I am Australian. I am very lucky to be here and I wouldn't want to be anywhere else.

    I am not a true blue Aussie when it comes to Australian food because it is so unhealthy lol and I sometimes don't really know what is Australian food since the country is so diverse in culture and nationalities. There are so many Chinese, Indian, English, Thai, Italian and Greek restaurants here but you hardly see an Australian restaurant. I do know there are about 2 Australian restaurants in Bali - I wonder what they serve there? A fancy meat pie? lol.

    I can name some iconic Australian foods which are: Vegemite which you spread a little bit on buttered bread (toast tastes better), meat pies, sausage rolls, Anzac biscuits, Bunderburg Rum, damper, cheezels (chips), burger rings (chips), sangas (sandwiches), chiko roll (this pastry filled roll (looks like huge springroll) - sometimes I don't know what is inside those things!) and last and not least the lamington cake which are traditional small sponge cakes covered in chocolate and then covered in coconut.


    My little friends from overseas (China) helped me make some lamington cakes the other day and they were so excited. Too bad the recipe wasn't a very good one. It was too sweet for their tiny taste buds. Well at least they know how the Aussie lamington is made. It was so cute to see how they were so focused and concentrated so hard in processing these cakes.

    I got this recipe from this site here (Aussie Slang) which came up first from a google search :P. Next time I will half the sugar! I probably make tiramisu with those lamingtons now.

    LAMINGTON CAKES

    by Aussie Slang http://www.aussieslang.com/features/australian-lamingtons-recipe.asp

    sponge cake

    Ingredients

    * 1/2 cup butter
    * 3/4 cup castor sugar
    * 1 teaspoon vanilla extract
    * 2 eggs
    * 2 cups self rising flour
    * 1/2 cup milk

    Method

    * Grease and Line a Lamington Tin (11 x 8 x 1.5 inches)
    * Cream the Butter, Castor Sugar and Vanilla until light and fluffy.
    * Add the eggs one at a time beating together as you go.
    * Fold in the Flour and Milk, alternating as you go.
    * Pour the batter into the prepared tin, spread evenly, and bake in a Moderate Oven (375f/190c) for 30-40 minutes or until an inserted toothpick comes out clean.
    * Allow to stand for a few minutes before turning out on to a cooling rack.
    * Leave to cool then store in the Fridge overnight.

    Choc Icing

    Ingredients

    * 1 slab sponge cake (one day old)
    * 4 cups icing sugar
    * 1/3 cup unsweetened cocoa powder
    * 2 tablespoons butter
    * 1/2 cup milk
    * 2 - 3 cups desiccated coconut

    To make the icing

    * Cool the cake for at least half an hour in the Fridge or Freezer, then cut into squares or fingers
    * Combine the Sugar and Cocoa in a large bowl
    * Heat the milk and butter in a saucepan until the butter is melted.
    * Add to the sugar/cocoa mixture and mix to a fluid yet not runny consistency

    To put it all together

    * Make a production line of Sponge Fingers, Chocolate Icing mixture in a bowl, coconut in a shallow container or plate, and a cooling rack with paper underneath.
    * Using a fork dip the sponge fingers into the icing, roll it in the coconut covering it well, and then place on to the rack to dry.
    * Once they have dried, place in an airtight container and leave to "mature" for at least a few hours, preferably overnight, before eating.


    Processing - sponge cake dipped into chocolate icing and then sprinkled with coconut! Too easy.
    Honestly, I should of just bought already made lamingtons from the store hihi

    16.1.10

    Easy Jam Drops

    I made these jam drops way last year but never decided to post it because it was a fail lol. I pretty much went overboard with filling the jam in the dents I made. Or maybe I didn't dent it enough and flattened the dough balls out properly. At the end it was eaten anyway. It was pretty good. It wasn't crunchy but really soft to the bite.

    Jam drops were always my childhood favourites. I used to get Jam Tarts which were close as jam drops in Woolworths. They only carry these in the black and white brand but hey it tasted as good and the price was pretty cheap.


    Ha! I went overboard with the jam!


    I got the "Jam Drop" recipe from Best Recipes Australia. The majority of the comments sounded like it was a pretty good recipe and that's why I chose this one. I didn't have cinnamon available in the pantry so I opted it out. Still tasted good.


    Exploded!


    Someone was satisfied lol


    ----------------
    --- On a different note I have been fixing up the website again since some of my readers said that my previous layout wasn't fitting into the screen. I forget that everyone has different computer monitors. I now changed it back to the orignal fluid width so it will fit in everyone's screens. So I hope it fits.

    8.1.10

    Vanilla Pandan Mango Swiss Cake / Swiss Roll

    Pandan cake (or anything to do with pandan) has always been my favourite at the Asian Markets. This cake is light, fluffy and flavoured with pandan juice. The light green colour is from the chlorophyll in the leaf juice. The cake is originally from Malaysia but you can find it anywhere in your local Asian markets nowadays. A slice of cake would usually cost around $2 and would be nice warm and fresh delivered on Saturday mornings. I have always wanted to try to bake pandan cake and today was the day :).

    I used a basic sponge cake recipe from CHOW TIMES and followed their techniques in baking a swiss roll. I made 2 roll cake bases to make a layered swiss roll instead the actual cake. I just left one base as vanilla and added pandan flavour to the second base. I then added whipped cream, mango and toasted almonds in between. I had a hard time rolling it up because it was so fat. The bases didn't turn out thick because I used a bigger tray :(. I really should invest in smaller trays. At the end it tasted really good! Nice and fluffy, moist and not too sweet which is the way I like it!


    This is my first attempt. I so didn't want to post it up cause it was a "fail" lol but hey when I rolled it there were no cracks! So I must be doing something right here.

    So how many of you made pandan cakes???? Did it turn out right the first time??? I am sure all of you have since it's a pretty popular google search keyword :).

    Have a good Friday! I am off out to dinner :D